That steep, dark hill in your yard. For many homeowners, it’s the most awkward part of the property. It’s hard to mow, tricky to plant, and at night, it just becomes a dark, imposing shape. You might even worry about it from a safety perspective.
What if that slope was actually your home’s most dramatic feature?
With the right approach, a sloped yard can become a stunning, multi-layered canvas for light. The challenge is real, but the payoff is huge. This is your guide to understanding the unique problems and brilliant solutions for landscape lighting for steep slopes.
We aren’t talking about temporary fixes. We’re focused on high-quality, professional-grade 12V (low-voltage) lighting systems. These are the durable, reliable setups that turn a “problem” hill into a safe, elegant, and breathtaking part of your home.
The Uphill Battle: Why Slopes Are a Unique Lighting Challenge
You can’t just take the same lighting plan from a flat yard and point it up a hill. Slopes introduce a new set of rules. Trying to light one is a masterclass in managing glare, water, and the simple force of gravity.
The Glare Problem
This is the number one mistake. On a flat surface, a light’s glare is easier to control. On a slope, your angles are all different. A spotlight pointed uphill can easily shine directly into your neighbor’s window or your own eyes as you look out from the deck. A light pointed downhill can create harsh, unsettling shadows and “hot spots” at the bottom.
The Water and Erosion Issue
Water loves to travel downhill. It’s a simple fact of physics. On a slope, rainwater will channel and flow, looking for the easiest path. It will pool around fixtures, seep into connections, and erode the soil, potentially exposing wires or destabilizing your lights. This makes proper installation and fixture quality non-negotiable.
The Installation and Maintenance Hurdle
Let’s be honest: just working on a steep slope is difficult. Digging trenches for wires is ten times harder. Securing fixtures so they don’t shift or lean over time requires specific techniques. You have to think about how you’ll access a light for adjustment or a bulb for replacement (which is why high-quality, long-life LEDs are a must).
5 Hillside Lighting Techniques That Create Magic
Because of these challenges, you need to think like a designer. You’re not just illuminating a slope; you’re sculpting it with light. Here are the core techniques professionals use.
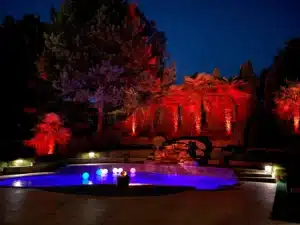
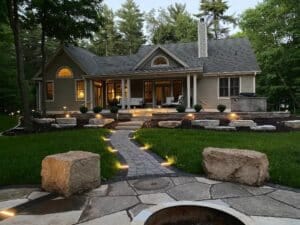
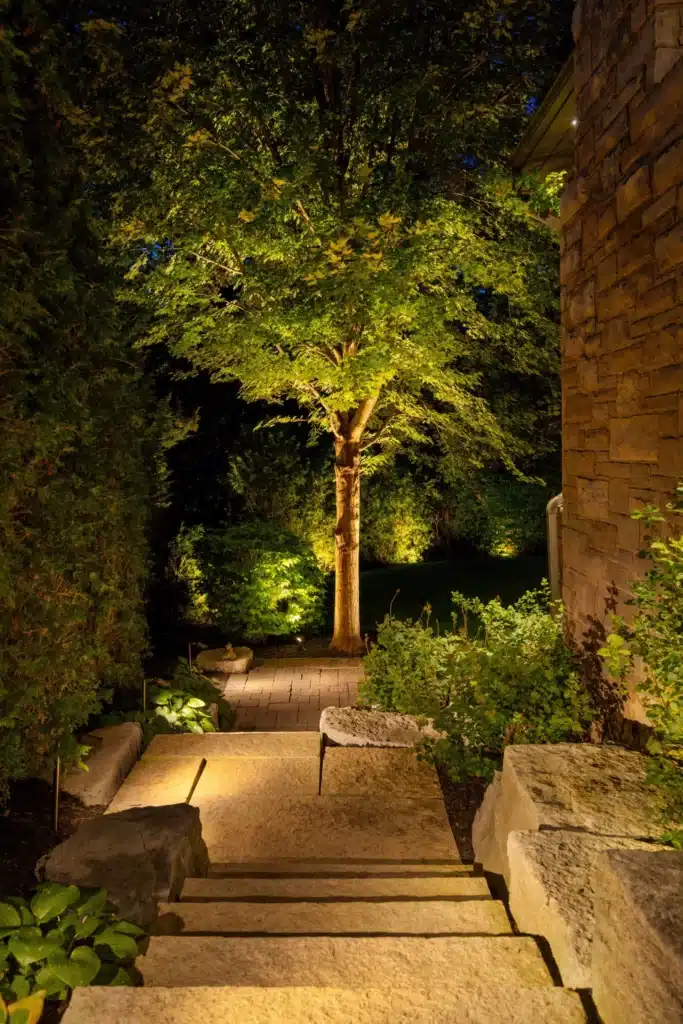
1. Uplighting: Creating Dramatic Highlights
This is the classic technique for a reason. Uplighting involves placing a spotlight at the base of a feature and aiming it upward. On a slope, this is perfect for:
- Specimen Trees: A single, beautiful Japanese maple or a tall evergreen becomes a living sculpture.
- Architectural Walls: The front of your home (if it’s on the slope) or a large retaining wall.
- Rock Formations: Boulders or rocky outcroppings gain instant texture and presence.
Slope Tip: Glare is the big enemy here. Use a spotlight with a “glare guard” or “shroud.” This metal or composite “snoot” on the end of the light focuses the beam and shields the bulb from view. Also, choose your beam-spread wisely. A narrow beam (like 25-30 degrees) is for tall, skinny trees. A wider beam (60 degrees) is for a wide stone wall.
2. Grazing: Highlighting Unique Textures
Grazing is a more subtle, sophisticated technique. You place a light source very close to a flat surface and aim the beam to “graze” across it. This makes every tiny imperfection and texture pop.
This is the number one way to light retaining walls, which are common on sloped properties. You can use small, discreet hardscape lights tucked under the capstone of a wall. The light washes straight down, creating a beautiful, scalloped effect. You can also use in-ground well lights at the base, aiming them almost straight up.
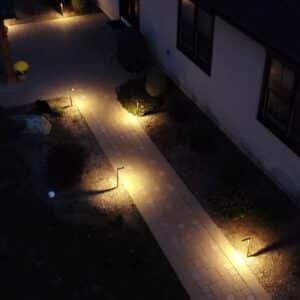
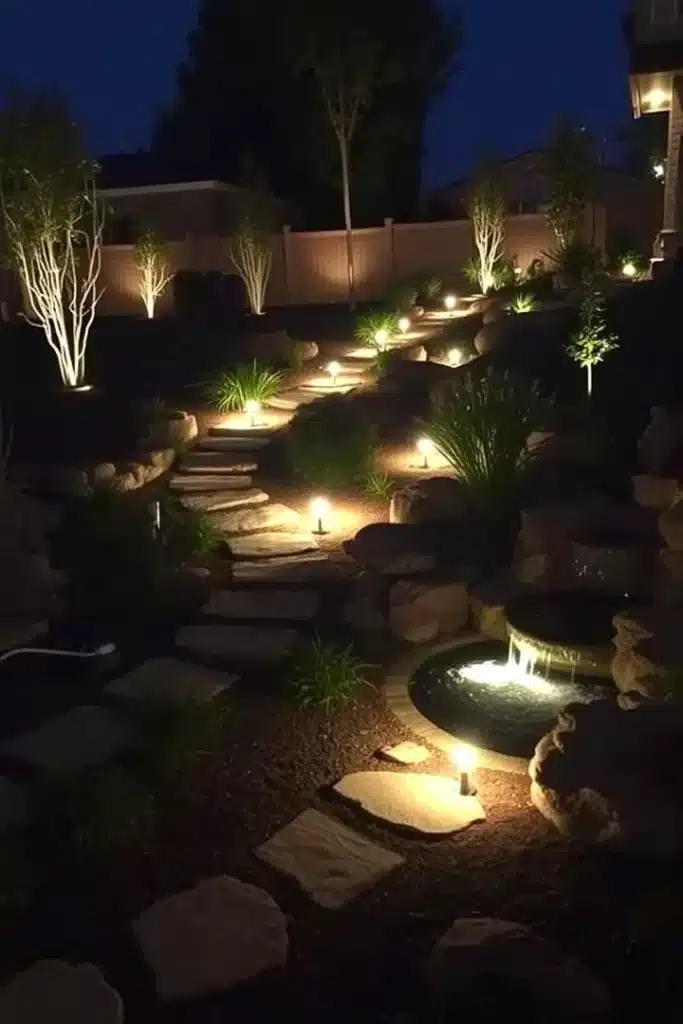
3. Step & Path Lighting: The Safety Essential
If your slope has a walkway or, especially, steps, functional lighting is not optional. It’s a critical safety feature. The goal is to illuminate the treads (where you step) and risers (the vertical part) so everyone can navigate safely.
- Step Lights: These are the cleanest solution. The fixture is built right into the riser of the stair, casting light downward onto the step below it. They are subtle, protected, and highly effective.
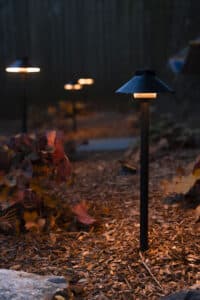
- Path Lights: If you have a winding path, you can use traditional path lights. The key on a slope is to stagger them. Don’t create an “airport runway” with two perfect, straight lines of lights. It looks unnatural. Place one on the left, then ten feet later, place one on the right. This creates a more organic, meandering feel. Always choose path lights with a deep shade that directs all light down, preventing glare.
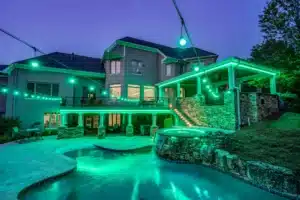
4. Moonlighting: Natural & Gentle Downlighting
This is a more advanced technique but provides the most natural look. “Moonlighting” involves placing wide-angle “downlights” (a type of spotlight) high up in the mature trees on the slope.
The fixtures are aimed downward, filtering light through the branches and leaves. This casts soft, dappled shadows on the ground below, perfectly mimicking the look of a full moon. It’s a fantastic way to light a large area of the slope gently, providing ambiance and a feeling of security.
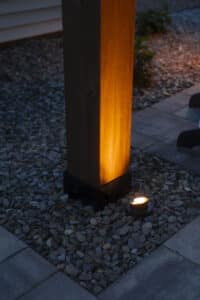
5. In-Ground (Well) Lights: The Unobtrusive Powerhouse
Well lights are fantastic for landscape lighting on steep slopes. The fixture is buried in the ground, so it’s completely flush with the surface. This has two huge benefits:
- Zero Profile: You can’t trip over it, and it won’t be damaged by string trimmers or foot traffic.
- Great for Uplighting: They are perfect for lighting the base of a large tree or the bottom of a wall, starting the light right from ground level.
Slope Tip: Drainage is critical. When you install a well light, dig the hole deeper than the fixture. Fill the bottom few inches with pea gravel before placing the light. This creates a “sump” so water drains away from the fixture instead of turning your well light into a tiny, muddy pond.
Your Toolkit: The Best Lights for Sloped Terrain
Now that you know the techniques, let’s look at the hardware. The materials and type of system you choose will determine if your project lasts two seasons or twenty years.
Why Low-Voltage (12V) is the Only Choice for Slopes
We mentioned this earlier, but it’s worth repeating. For lighting on a slope, especially with moisture and installation challenges, a 12-volt system is the professional standard.
- Safety: 12V lighting is incredibly safe. The risk of electric shock is minimal, even in wet conditions. This is a huge bonus when you have buried wires in an area with a lot of water runoff.
- Efficiency: Modern 12V systems use high-efficiency LED bulbs that last for 15,000-40,000 hours. You won’t be climbing that steep hill to change a bulb every six months.
- Flexibility: The wiring is lightweight, easy to bury (only needs to be 6 inches deep), and simple to adjust later.
The best systems use fixtures made of heavy-duty materials like brass. Brass doesn’t rust, corrode, or get brittle. It withstands moisture, soil, and impacts. It’s a “buy it once, install it for life” kind of investment.
Fixture Match-Up: Technique vs. Tool
Here’s a simple table to connect the ideas we’ve discussed.
| Lighting Technique | Recommended Fixture Type | Why It Works on a Slope |
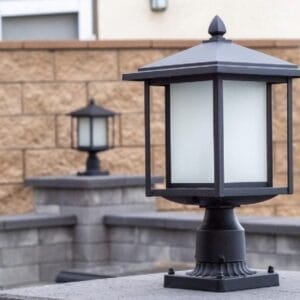
| Uplighting | Spotlights (e.g., Brass Spotlights) | Powerful, directional beams. Can be staked securely. Adjustable knuckles let you aim perfectly, even on an angle. |
| Grazing / Wall Washing | Hardscape Lights or Well Lights | Hardscape lights fit right under capstones. Well lights sit flush, grazing stone walls from below. Both are protected from damage. |
| Step & Path Safety | Step Lights & Path Lights | Step lights mount flush into risers for built-in safety. Path lights with glare shields direct light down onto the walkway. |
| Moonlighting | Downlights (Specialty Spotlights) | Mounted high in trees, they are out of the way. The effect is broad, gentle, and perfect for overall slope safety. |
| Subtle Accents | Area Lights | Broader than a path light, good for illuminating beds of groundcover on a slope without creating a single “hotspot.” |
The Nitty-Gritty: Installation and Safety on Uneven Ground
A great design is useless if the installation fails. On a slope, “how” you install is as important as “what” you install.
The Wiring Challenge
“How do you run wires on a sloped yard?” is one of the most common questions. Here are the rules of thumb:
- Run Horizontally: When possible, run your main low-voltage wire across the slope (horizontally), not straight down it. This prevents water from “channeling” down your wire trench and causing erosion.
- Use Drip Loops: At any connection point, especially where the wire meets the fixture, leave a little slack and create a “drip loop.” This is a small U-bend in the wire just before the connection. Water running down the wire will hit the bottom of the “U” and drip off, rather than following the wire right into the sensitive connection.
- Secure Everything: Use long, sturdy stakes for your fixtures. On soft, sloped soil, a standard stake can lean. Use high-quality landscape staples to secure your wire into the trench before you bury it. Soil shifts on a hill.
The Glare Problem: Solved
We’ve all seen it: a home lit up like a fortress, with blinding spotlights pointing every which way. Here’s how you ensure your lighting is elegant, not obnoxious.
- Walk the Property: Once your lights are in place (but before you’ve buried all the wires), wait until dark. Turn them on. Now, walk. Walk down the slope, up the slope, and go inside your house and look out every window.
- Check the Neighbors: Be a good neighbor. Walk across the street. Is one of your lights shining right into their living room? If so, adjust it.
- Use Your Tools: This is where glare guards, fixture-mounted dimmers, and careful aiming make all the difference. A tiny 10-degree adjustment in a spotlight’s aim can be the difference between a “wow” and an “ow.”
Don’t Be Afraid of the Dark (Hill)
A steep slope isn’t a landscape liability; it’s an opportunity for a truly stunning, multi-layered lighting design. It’s a chance to play with light and shadow in a three-dimensional way that flat-yard owners can only dream of.
By understanding the challenges of glare, water, and installation, you can build a smart, safe, and beautiful system. Focus on creating drama with uplighting, ensuring security with step lighting, and highlighting texture with grazing. And most importantly, choose the right equipment: durable, professional-grade 12V LED lights that are built to last.
That challenging terrain outside your window? It’s ready for its glow-up. Start exploring high-quality spotlights, path lights, and hardscape lights to build your perfect system.
What’s the biggest lighting challenge on your slope? Share your questions or your own hard-won tips in the comments below!