It’s the sound every homeowner with a garden shovel dreads: thunk…snip.
You were just trying to plant a new shrub or edge the flower bed, and now your beautiful landscape lighting is dark. A severed low-voltage cable can feel like a major disaster, but here’s the good news: it’s almost always a fix you can handle yourself.
Don’t panic and dial an electrician just yet. Your professional, high-quality lighting system is designed to be serviceable. This guide provides the clear, safe protocols you need for effective Wire Damage Resolution. We’ll walk you through the entire process, from the first safety check to the final waterproof seal, ensuring your outdoor ambiance is back online in no time.
The Shocking Truth (and Why It’s Not So Shocking)
First, let’s address the big fear. You cut a live wire. Is it dangerous?
The systems we love, like those from Tru-Scapes, are “low-voltage” for a reason. They typically run on 12 to 15 volts, which is dramatically less than the 120 volts inside your home. This design makes them incredibly safe for outdoor environments, and you are not in any immediate danger from a simple cut.
However, “low” voltage doesn’t mean “no” voltage. The real danger isn’t to you, but to your system. A short circuit can overload your transformer, and persistent moisture in a bad repair can lead to corrosion and system-wide failure down the line. As safety experts like the National Fire Protection Association (NFPA) note, managing electrical systems correctly is key to preventing hazards.
So, your first step isn’t panic. It’s power.
Safety Protocol #1: Always disconnect the power at the source. Go to your landscape lighting transformer—the metal box plugged into an outlet—and unplug it completely.
Do not just rely on the timer. Unplug it from the wall. This is the only way to ensure the entire line is dead and safe to work on, aligning with the core principles of home electrical safety.
Your Toolkit for a Professional-Grade Repair
You don’t need a truck full of specialized gear, but you do need the right tools. Using the wrong materials is the number one reason DIY repairs fail.
Essential Tools:
- A small shovel or trowel
- Utility knife
- Wire strippers (a utility knife can work, but strippers are safer)
- Wire cutters
Essential Materials:
- Waterproof Wire Connectors: This is the most critical part of the repair.
- A small piece of 12/2 or 10/2 direct-burial landscape cable: You’ll only need this if the cut removed a section of wire and you can’t get the two ends to meet.
The Crucial Choice: Selection of Waterproof Wire Connectors
I cannot stress this enough: do not use electrical tape. Do not use the orange or yellow wire nuts from your garage. They are not waterproof. They will fail.
When you bury a connection, it’s exposed to moisture, soil microbes, and temperature swings. A non-waterproof connection will corrode in weeks or months, leading to flickering lights or total failure. The goal is to make a connection that is just as durable as the original, uncut cable.
This is where the selection of waterproof wire connectors becomes the key to a lasting repair.
| Connector Type | How It Works | Pros | Cons |
| Silicone-Filled Twist Nut | A standard wire nut (cap) that sits inside a plastic housing pre-filled with silicone grease. | Common, easy to use, good waterproofing. | Can be messy. Silicone can dry out over many years. |
| Snap-Lock Connectors | A small plastic housing with built-in metal contacts. You insert the wires and snap it shut. | Very easy, no wire stripping needed, often gel-filled. | Can be bulky. Must use the exact right size. |
| Heat-Shrink Tubing | A solder-and-sleeve system. You twist wires, solder, and use a heat gun to shrink a marine-grade tube. | Creates the most permanent, professional, and water-tight seal. | Requires a heat gun and more skill. |
| Direct-Burial Splice Kit | A more robust kit, often involving a crimp, a grease tube, and a durable outer housing. | Extremely tough, designed for direct burial. | Often overkill for a simple one-light repair. |
For most homeowners, a high-quality, silicone-filled twist nut is the perfect balance of reliability and ease of use. They are designed specifically for the remediation of damaged outdoor light wiring and are widely available.
The Step-by-Step Guide to Wire Damage Resolution
With your power off and your tools ready, it’s time to fix the break.
Step 1: Power Down (Yes, Again)
I’m saying it twice because it’s that important. Go check the transformer. Is it unplugged? Good. This aligns with CPSC electrical safety guides for homeowners, which always put “power off” as the first step.
Step 2: Expose the Cable
Carefully dig around the area of the cut. You’ll want to expose at least 6-8 inches of cable on both sides of the break. Pull the two ends up out of the dirt so you have room to work.
If you shredded the wire with a tiller or aerator, you may have multiple breaks. Inspect the line carefully. A clean shovel cut is the easiest fix.
Step 3: Clean and Prep the Wires
Wipe the mud and grit off the cable ends.
- If it’s a clean cut: Use your wire strippers to remove about 1/2 inch of the outer black insulation from each of the two main wires on both ends. You will now have four exposed copper wire ends.
- If the cut is jagged: Use your wire cutters to make a fresh, clean cut on both sides of the break. Then, proceed with stripping the insulation.
Your 12/2 cable has two identical wires running side-by-side. In low-voltage lighting, polarity doesn’t matter. You just need to connect one wire from the “transformer side” to one wire on the “light side,” and then do the same for the other wire.
Step 4: Make the Connection (The Right Way)
This is one of the most vital low voltage cable repair techniques. Don’t just twist the wires and tape them.
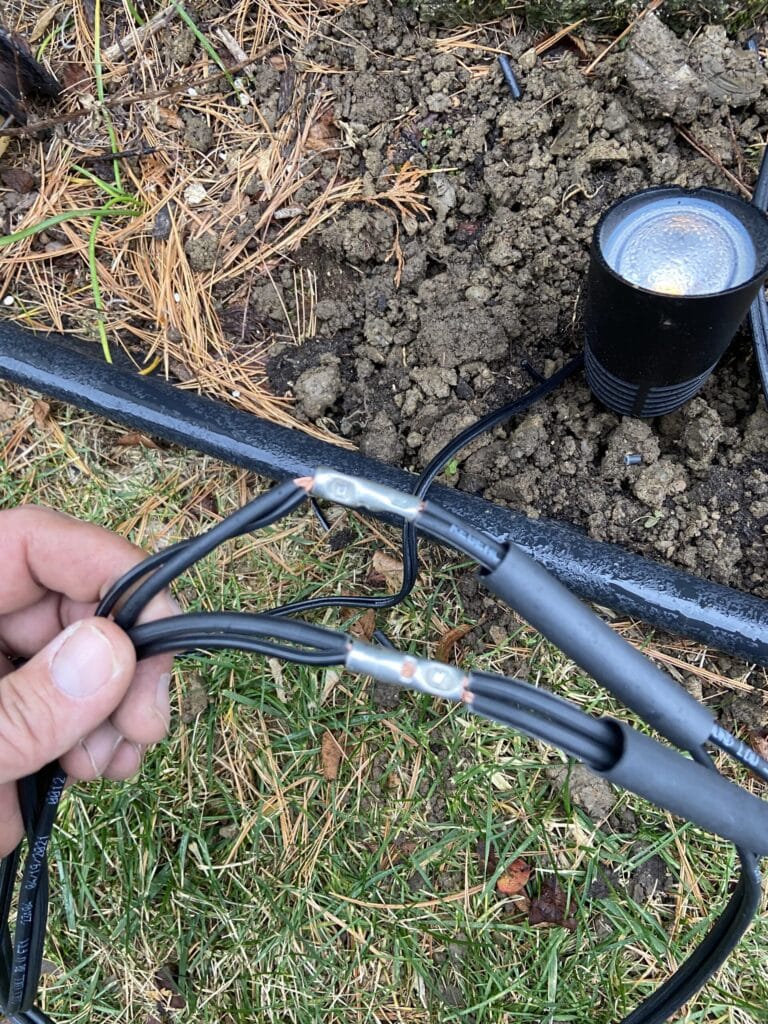
- Take one wire from the transformer side and one wire from the light side.
- Hold the exposed copper ends parallel and twist them together clockwise using your fingers or pliers until they are snug.
- Take a waterproof wire nut. Firmly push the twisted copper pair all the way up into the nut.
- Twist the nut clockwise. Keep twisting until it’s very snug and you feel the wires “bite” and lock. The silicone grease should visibly ooze out, which is how you know it’s sealing.
- Give a gentle tug. If it’s solid, you’re good.
- Repeat this entire process for the second pair of wires with a separate waterproof wire nut.
You will have two separate, waterproof connections.
Step 5: Test and Tidy
Before you bury your hard work, let’s test it. Go back to the transformer, plug it in, and turn it on.
Are your lights back on? Excellent.
If not, unplug the transformer and double-check your connections. The most likely culprit is a wire that isn’t seated deeply enough in the nut. This is a common step in any landscape lighting troubleshooting guide.
Step 6: Waterproof and Bury
Once you’ve confirmed the fix, unplug the transformer one last time.
Tuck the repaired wires neatly back into the trench. Try to avoid sharp bends. It’s good practice to create a small “service loop” (a gentle S-curve) with the wire. This gives you a little slack for any future work and protects against ground heave from frost.
Bury the cable. Your cable should be buried at least 6 inches deep to protect it from future aerators, edgers, and trowels. (As a best practice for any digging project, always call 811 first to locate underground utilities).
Common Mistakes That Lead to Future Headaches
- The Electrical Tape Fail: This is the most common mistake. Electrical tape is not waterproof. It will peel, water will get in, and your wire will corrode. This is not remediation of damaged outdoor light wiring; it’s just delaying the next repair.
- Using Indoor Wire Nuts: Those little plastic cones are not sealed. They will fill with water.
- A “Shallow Grave”: Burying the wire only 1-2 inches deep is asking for another snip the next time you’re in the garden. Go for 6 inches.
- Not Unplugging the Transformer: While 12 volts won’t hurt you, it can short out and pop the fuse or circuit breaker in your transformer, turning your simple wire fix into a bigger problem.
This is all why proper landscape lighting maintenance is so important for the life of your system.
When to DIY vs. When to Call a Pro
This guide for Wire Damage Resolution covers the most common problem: a single, clean cut to a cable. This is a perfect, 100% DIY-friendly weekend project.
However, you might want to call a professional landscape lighting installer if you encounter:
- Multiple, unknown breaks: If your lights are out but you have no idea where the break is (perhaps from an animal), a pro has tools to trace the line and find the fault.
- Damage near the transformer: If the damage is very close to the transformer or involves the main “home run” wire, it’s best to let an expert handle it.
- You’re just not comfortable: Your time is valuable. If you’d rather not spend an hour in the dirt, a local Tru-Scapes certified contractor can have it fixed in minutes.
A severed wire is a moment of frustration, but it’s not a catastrophe. By using the right tools, the right connectors, and following these safe, simple protocols, you can confidently repair your system and get back to enjoying your beautifully lit outdoor space.
Conclusion
A severed landscape lighting wire is one of the most common issues homeowners face, but it’s also one of the most fixable. The keys to success are simple: safety first (unplug that transformer!), a clean work area, and an absolute commitment to using waterproof connectors. A professional-grade system deserves a professional-grade repair, even when you’re the one doing it.
What’s your own experience with outdoor lighting repairs? Have you ever faced the dreaded snip? Share your own stories or questions in the comments below!