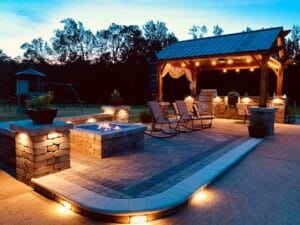
A well-lit yard is more than an aesthetic upgrade—it increases safety, deters intruders, and dramatically boosts curb appeal after dark. Yet many homeowners install a handful of stake lights and call it done, only to end up with flat, uninspiring results that do nothing for their home’s exterior.
The good news is that learning how to design a professional landscape lighting layout is entirely achievable as a DIY project—even without an electrical background. This guide covers everything: planning your layout, selecting outdoor landscape lighting fixtures, sizing a landscape lighting transformer, and achieving the layered, polished look that professional designers charge hundreds of dollars for. From handling local soil conditions to seasonal weather, see examples of successful landscape lighting projects in Wheaton, Maryland to understand how regional factors influence design.
By the end, you’ll have a clear, actionable plan for transforming your yard from forgettable to stunning.
Key Takeaways
- Learning how to design a professional landscape lighting layout starts with a simple yard map and a wattage budget.
- LED landscape lights use up to 75% less energy than halogen alternatives and last significantly longer.
- A correctly sized landscape lighting transformer prevents tripped circuits and uneven brightness.
- Uplighting for trees and pathway landscape lights are the two highest-impact fixture types for curb appeal.
- Low voltage landscape lighting kits are the safest and most beginner-friendly starting point for DIYers.
- Spacing, layering, and aiming angles determine whether your yard looks polished or amateurish.
Step 1 – Plan Your Layout Before You Buy a Single Fixture
Rushing to purchase fixtures before planning is the most common and costly mistake in landscape lighting design. A few hours of upfront planning saves money, reduces wasted trips to the hardware store, and ensures a cohesive look.
Draw a Simple Yard Map
Sketch your property to scale—graph paper works well. Mark the following elements:
- House perimeter and garage
- Driveways, walkways, and pathways
- Trees, shrubs, garden beds, and water features
- Existing outdoor outlets and the location of your electrical panel
Your map becomes the foundation for every decision that follows: fixture types, wire runs, transformer placement, and zone groupings.
Identify Your Lighting Goals
Before selecting any hardware, clarify what you want the lighting to accomplish:
- Safety and navigation – illuminating steps, walkways, and entry points
- Security – eliminating dark zones near doors, gates, and driveways
- Aesthetics – highlighting architectural features, trees, or garden focal points
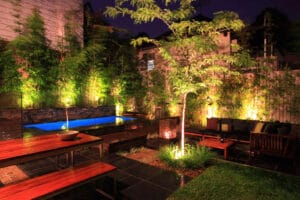
- Ambiance – creating a warm, inviting atmosphere for outdoor entertaining
If you need security as a primary goal, choose brighter fixtures (above 200 lumens) with wide beam angles. If ambiance is the priority, warmer color temperatures (2700K–3000K) and directional fixtures create a more sophisticated result.
Step 2 – Choose the Right Outdoor Landscape Lighting Fixtures
Professional landscape lighting design relies on layering—combining different fixture types to create depth and visual interest. Here are the main categories and when to use each.
| Fixture Type | Best Use | Typical Lumen Range | Mounting |
|---|---|---|---|
| Pathway landscape lights | Walkways, driveways, garden borders | 40–200 lm | Ground stake |
| Uplighting for trees | Trees, tall shrubs, architectural features | 200–1,000 lm | Ground / stake |
| Spotlights | Focal points, flags, statues | 300–1,200 lm | Ground / stake |
| Floodlights | Broad areas, security zones | 700–3,000 lm | Wall / pole |
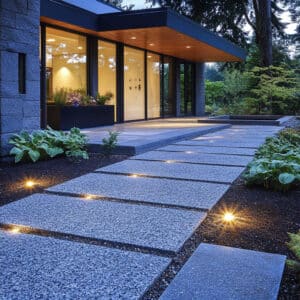
| Well lights | Embedded uplighting in lawns / hardscape | 200–600 lm | In-ground |
| Step & deck lights | Stairs, deck edges, retaining walls | 30–150 lm | Surface-mount |
| String / bistro lights | Pergolas, patios, entertaining spaces | Variable | Overhead |
Why LED Landscape Lights Are the Smart Choice
Modern LED landscape lights have replaced halogen and incandescent options as the industry standard. According to U.S. Department of Energy data on LED efficiency, LED lighting uses significantly less energy than traditional sources and lasts many times longer—reducing both operating costs and maintenance.
Key advantages of LED landscape lights:
- Lower wattage means more fixtures per transformer zone
- Consistent color output over the life of the bulb
- Available in a wide range of color temperatures (2700K warm to 5000K daylight)
- Rated for outdoor use with appropriate IP (Ingress Protection) ratings
Whether you need warm ambiance or crisp security light, learn how to choose the right color temperature for your specific outdoor space. If you need warm, inviting light for an entertaining space, choose 2700K–3000K LEDs. If you need crisp, bright light for security zones, opt for 4000K–5000K. While solar is convenient, discover why low-voltage outperforms solar in terms of reliability, brightness, and longevity.
Step 3 – Size Your Landscape Lighting Transformer Correctly
The landscape lighting transformer is the heart of a low voltage system. It converts standard 120V household current to safe 12V AC power. Choosing the wrong size—too small or too large—leads to flickering lights, tripped breakers, or wasted capacity.
How to Calculate Transformer Wattage
- Add up fixture wattages: List every fixture you plan to install and note its wattage. LED pathway lights are typically 3–6 watts; uplights range from 5–20 watts.
- Apply a 20% buffer: Multiply your total by 1.2 to account for voltage drop and future expansion. Example: 180 total watts × 1.2 = 216 watts minimum transformer capacity.
- Match to available units: Transformers typically come in 150W, 300W, 600W, and 1,200W capacities. Round up to the next size.
Not sure where to start? Consult our detailed transformer sizing guide to calculate your exact wattage needs and avoid common pitfalls.
Zones and Timer Features
Most quality landscape lighting transformers include multiple zones, photocell sensors (auto on/off at dusk/dawn), and programmable timers. Zoning allows different areas of your yard to operate on separate schedules—pathways might stay on all night while accent lights turn off at midnight.
Step 4 – Run Wire and Install Fixtures
Low voltage landscape lighting kits typically include everything needed for a basic installation: transformer, wire, fixtures, and connectors. For larger custom layouts, you’ll source components separately.
Low Voltage Wiring Basics
- Use 12-gauge wire for runs up to 100 feet; 10-gauge for longer runs
- Do not exceed 100 watts per wire run to minimize voltage drop
- Daisy-chain connections are common but T-taps (branching) maintain more consistent voltage across fixtures
- Bury wire at least 6 inches deep along beds; use conduit under driveways or hardscape
Always adhere to National Electrical Code safety standards regarding GFCI protection and burial depths to ensure a safe installation. Use 12-gauge wire for runs up to 100 feet to prevent voltage drop issues and ensure consistent brightness.
Step-by-Step Installation
- Mount the transformer near an outdoor GFCI outlet, ideally 1–2 feet above grade.
- Lay out wire runs along planned fixture locations without burying yet.
- Connect fixtures to the wire using manufacturer connectors—most snap on without stripping.
- Connect wire ends to the transformer terminals, observing polarity.
- Power on and test all fixtures before burying wire or finalizing stake placement.
- Adjust aim angles and heights while the system is live for best results.
- Bury wire, tuck connections under mulch, and set transformer timer/photocell.
Once your plan is ready, follow our full step-by-step installation walkthrough for detailed wiring diagrams and connection tips.
Step 5 – Apply Professional Landscape Lighting Design Principles
The Rule of Three: Layering Light
Professional landscape lighting design almost always uses three layers of light working together:
- Ambient layer: General illumination from pathway lights, area lights, or overhead string lights.
- Task layer: Directional light for functional areas—entry paths, stairs, driveways.
- Accent layer: Dramatic uplighting for trees, spotlights on architectural details.
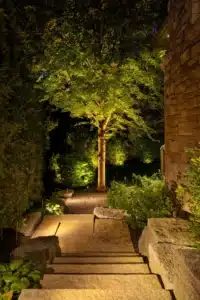
Uplighting for Trees: Technique Matters
Uplighting for trees creates dramatic focal points but requires careful technique. Place the fixture 12–24 inches from the base of the tree for most specimens. Aim the beam angle to catch the canopy without ‘hot-spotting’ (leaving a harsh bright circle on the trunk).
For dramatic focal points, master tree uplighting techniques by placing fixtures at the base and aiming upward. For a naturalistic look, use two fixtures at different angles on either side of the tree. Narrower beam angles (10–25 degrees) work best for tall, narrow trees; wider angles (36–60 degrees) suit spreading shade trees. To minimize light pollution and protect local wildlife, follow DarkSky International’s best practices for responsible lighting when aiming your fixtures.
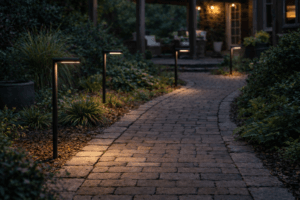
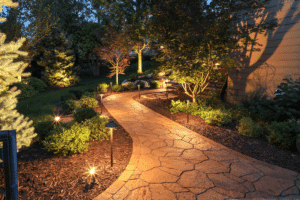
Pathway Landscape Lights: Spacing and Height
A common beginner mistake is over-lighting pathways. Pathway landscape lights should guide the eye, not create a runway effect. Industry guidance from landscape lighting associations recommends spacing fixtures 8–10 feet apart along paths, staggering them on alternate sides to create a natural, winding rhythm.
Fixture height matters too. Low-profile bollard lights (12–18 inches) feel intimate and blend into the landscape; taller post lights (24–36 inches) provide more coverage but can feel harsh if over-bright.
DIY vs. Professional Installation: Pros and Cons
DIY Landscape Lighting
- Pros: Lower cost (save on labor), full creative control, satisfaction of self-installation, easy to modify.
- Pros: Low voltage systems are legal for homeowner installation in all 50 states without a permit.
- Cons: Time investment (a typical yard takes 4–8 hours for a first installation).
- Cons: Risk of voltage drop issues, poor aiming, or overloading transformer without planning.
- Cons: Quality varies widely in consumer-grade fixtures compared to contractor-grade products.
Professional Installation
- Pros: Expert design, contractor-grade fixtures, and experienced wiring reduce long-term problems.
- Pros: Many installers offer ongoing maintenance plans.
- Cons: Significantly higher upfront cost; a typical residential install can run several thousand dollars.
- Cons: Less flexibility to make changes without calling the contractor back.
Not sure which path is right for you? Compare DIY vs. professional installation costs, pros, and cons before you begin.
Landscape Lighting Do’s and Don’ts
Do’s
- Do use LED landscape lights exclusively for energy savings and longevity.
- Do plan your transformer capacity with a 20% buffer for future expansion.
- Do test fixture placement before burying wire.
- Do use a photocell sensor so lights turn on and off automatically.
- Do consider color temperature—2700K–3000K for warm, welcoming light near living areas.
Don’ts
- Don’t over-light pathways—more fixtures closer together does not equal better results.
- Don’t aim uplights directly at eye level; always angle them upward toward the feature.
- Don’t use the same brightness everywhere; vary lumens to create visual interest.
- Don’t run a single wire run longer than 100 feet without stepping up to heavier gauge wire.
- Don’t install fixtures in areas that will be regularly disturbed by lawn equipment.
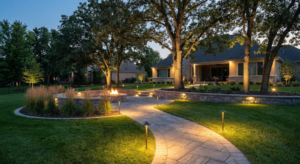
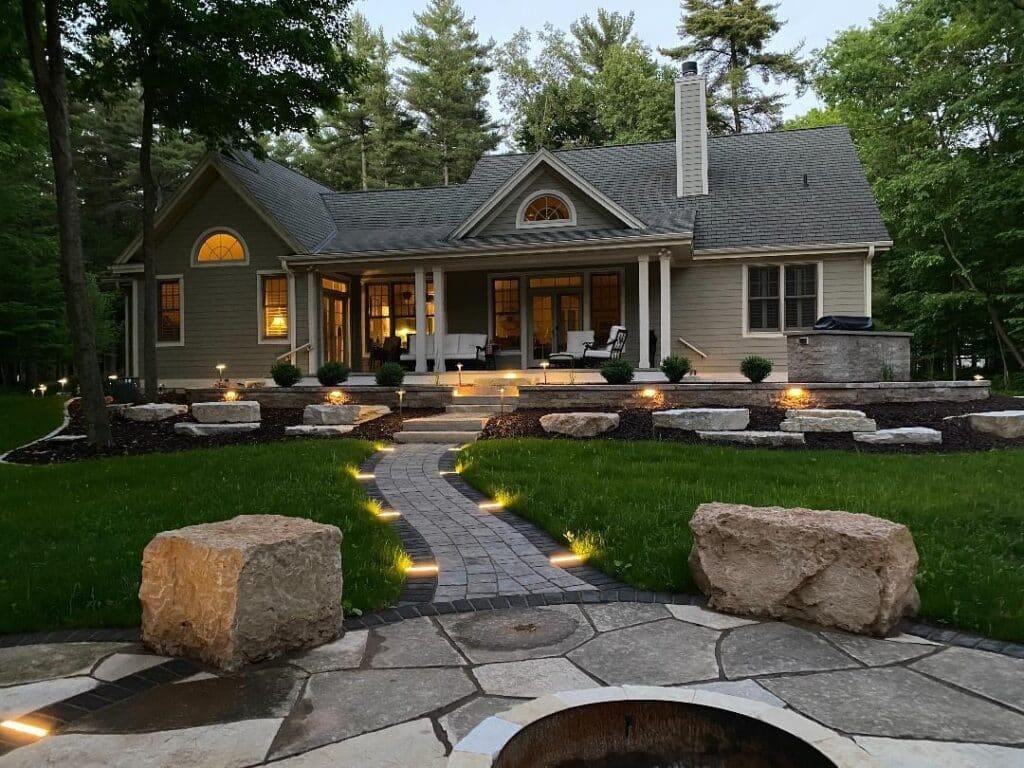
Real-World Example (Hypothetical): A Suburban Backyard Transformation
Consider a homeowner in the Midwest with a standard suburban lot: a detached garage, a flagstone patio, three mature oak trees, and a 40-foot pathway from the driveway to the back gate.
Their plan: a 300-watt transformer with two zones. Zone 1 runs six pathway landscape lights (5W each = 30W) along the main walk and three step lights (3W each = 9W) on the patio stairs. Zone 2 powers three uplights for trees (12W each = 36W) and two spotlights on the garage facade (10W each = 20W). Total load: 95 watts—well within the 300W transformer capacity, leaving ample room for future additions.
The result: a layered system with warm 2700K LEDs that creates drama at the oaks, safe navigation along the path, and a welcoming glow on the home’s entry. Total materials cost came in under $600 using quality consumer-grade LED fixtures—a fraction of a comparable professional installation.
Frequently Asked Questions
1. What is low voltage landscape lighting? Low voltage landscape lighting operates on 12V AC power supplied by a transformer that plugs into a standard outdoor outlet. It is safe, energy-efficient, and legal for homeowner installation without a permit in all U.S. states.
2. How many lumens do I need for pathway lights? Most pathway landscape lights perform well in the 50–150 lumen range. Higher lumens (200+) create a harsh, over-bright look on walkways. The goal is gentle guidance, not floodlighting.
3. What size transformer do I need? Add up the total wattage of all your planned fixtures, then multiply by 1.2 to get your minimum transformer size. If your total is 180W, choose at least a 216W capacity—a 300W unit is a safe, practical choice that allows future expansion.
4. Can I install landscape lighting myself? Yes. Low voltage systems (12V) are specifically designed for homeowner installation. No electrical permit is required in any U.S. state for low voltage outdoor lighting. High-voltage (120V) installations, however, require a licensed electrician.
5. What is the best color temperature for landscape lighting? Most landscape lighting designers recommend 2700K–3000K for residential outdoor lighting. This warm white range is flattering on plants, wood, and stone. Reserve cooler temperatures (4000K+) for security and commercial applications.
6. How far apart should pathway lights be spaced? Space pathway landscape lights 8–10 feet apart, staggered on alternating sides of the path. Closer spacing (4–6 feet) creates an over-lit runway effect that diminishes the overall design quality.
7. How do I prevent voltage drop? Keep each wire run to 100 watts or fewer, use 12-gauge wire as a minimum, and use a T-tap (branching) layout rather than a long daisy chain where possible. For runs exceeding 100 feet, upgrade to 10-gauge wire.
8. Are solar landscape lights good? Solar pathway lights work well in sunny climates and require no wiring, but they provide significantly less brightness and reliability than low voltage LED systems. For professional results, a wired low voltage system is strongly preferred.
9. What is uplighting for trees? Uplighting for trees involves placing ground-level fixtures at the base of a tree and aiming the beam upward into the canopy. This technique creates dramatic silhouettes and focal points and is one of the most impactful techniques in professional landscape lighting design.
10. Do landscape lights need a GFCI outlet? Yes. The National Electrical Code (NEC) requires that outdoor outlets used for landscape lighting transformers be GFCI-protected. Most outdoor outlets installed after 1978 already meet this requirement.
Glossary of Terms
Low Voltage Landscape Lighting A lighting system that operates at 12 volts AC using a step-down transformer. It is safer than line-voltage systems, requires no permit for DIY installation, and is the standard for residential outdoor lighting in the U.S.
Landscape Lighting Transformer An electrical device that converts 120V household current to 12V AC power for low voltage fixtures. Transformers are rated in watts and typically include timers, photocell sensors, and multiple output zones.
Uplighting A lighting technique where fixtures are placed at or near ground level and aimed upward to illuminate vertical subjects such as trees, walls, columns, or architectural facades. Uplighting for trees is one of the most commonly used techniques in professional outdoor design.
Voltage Drop The reduction in electrical voltage that occurs as current travels through wire resistance over distance. In low voltage landscape lighting, voltage drop can cause fixtures at the end of long wire runs to appear dimmer than those near the transformer.
Conclusion: Light Your Yard Like a Pro
Designing a professional landscape lighting layout is one of the most rewarding home improvement projects you can tackle yourself. With a solid plan, the right LED fixtures, a properly sized transformer, and attention to the layering principles the pros use, you can achieve results that look anything but DIY.
Start with your yard map, calculate your wattage budget, and work outward from your transformer. Use pathway landscape lights to guide movement, uplighting for trees to create drama, and accent fixtures to celebrate your home’s best architectural features.
Ready to get started? Browse our full selection of low voltage landscape lighting kits, LED landscape lights, and landscape lighting transformers to find everything you need for a professional outdoor lighting design—all in one place.