There is nothing quite like the magic of a well-designed landscape lighting system. It turns your yard into a warm, inviting oasis, highlights your home’s best features, and adds a crucial layer of safety.
Until it stops working.
It is that sinking feeling on a beautiful evening: you are expecting that lovely glow, and instead, you get… nothing. Or maybe just one section is out, or the lights are flickering. Let’s be honest, it’s frustrating.
Many homeowners immediately suspect the bulbs or the fixtures. But more often than not, the culprit is the heart of the system: the transformer.
Before you start pricing out a costly replacement or calling a professional, many common issues can be solved with a little detective work. This guide provides a complete, step-by-step procedure for landscape lighting transformer troubleshooting. We will walk you through everything from the simplest fixes to a definitive test of the unit itself.
Before You Begin: Safety First and Simple Fixes
Always put safety first. We are dealing with electricity, so exercise caution. While the system itself is low-voltage (typically 12V), the transformer plugs into a high-voltage (120V) household outlet.
Never perform any tests or inspections you are uncomfortable with.
With that said, the solution is often surprisingly simple. Before you even touch the transformer, let’s check the basics. This process is the first step in our essential landscape lighting troubleshooting guide.
- Check the Power Switch: This may sound silly, but make sure the switch controlling the outlet is on. If the outlet is connected to a light switch inside your home, that switch must be on.
- Check the GFCI Outlet: This is the most common culprit. Go to the 120V outlet the transformer is plugged into. This is almost always a Ground Fault Circuit Interrupter (GFCI) outlet, which has “Test” and “Reset” buttons.
- GFCI outlets are sensitive to moisture (common outdoors) and will “trip” to prevent a shock.
- Unplug the transformer.
- Press the “Reset” button firmly. You might hear a click.
- Plug the transformer back in. If your lights come on, you have found the problem. If the GFCI trips again immediately, you may have a short in your system or a faulty transformer.
- Check the Circuit Breaker: Go to your home’s circuit breaker panel. Find the breaker that controls your outdoor outlets. If it is in the “Off” or a middle position, flip it all the way off and then back to “On.”
If these simple fixes do not work, it is time to move on to the transformer itself.
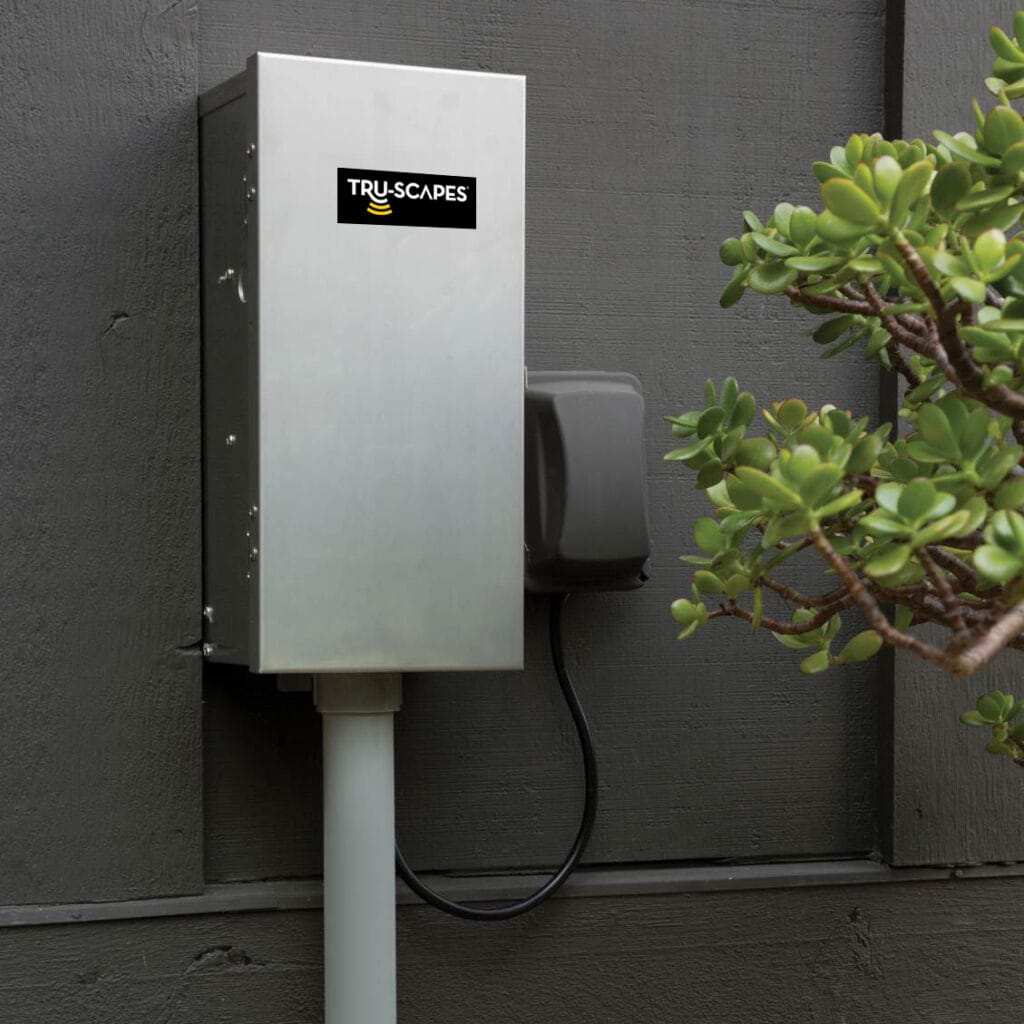
Understanding Your Low-Voltage Transformer
Think of your low-voltage transformer as the heart of your lighting system. Its job is simple but critical: it takes the standard 120-volt power from your home and “steps it down” to a safe, usable 12-volt or 15-volt current for your landscape lights.
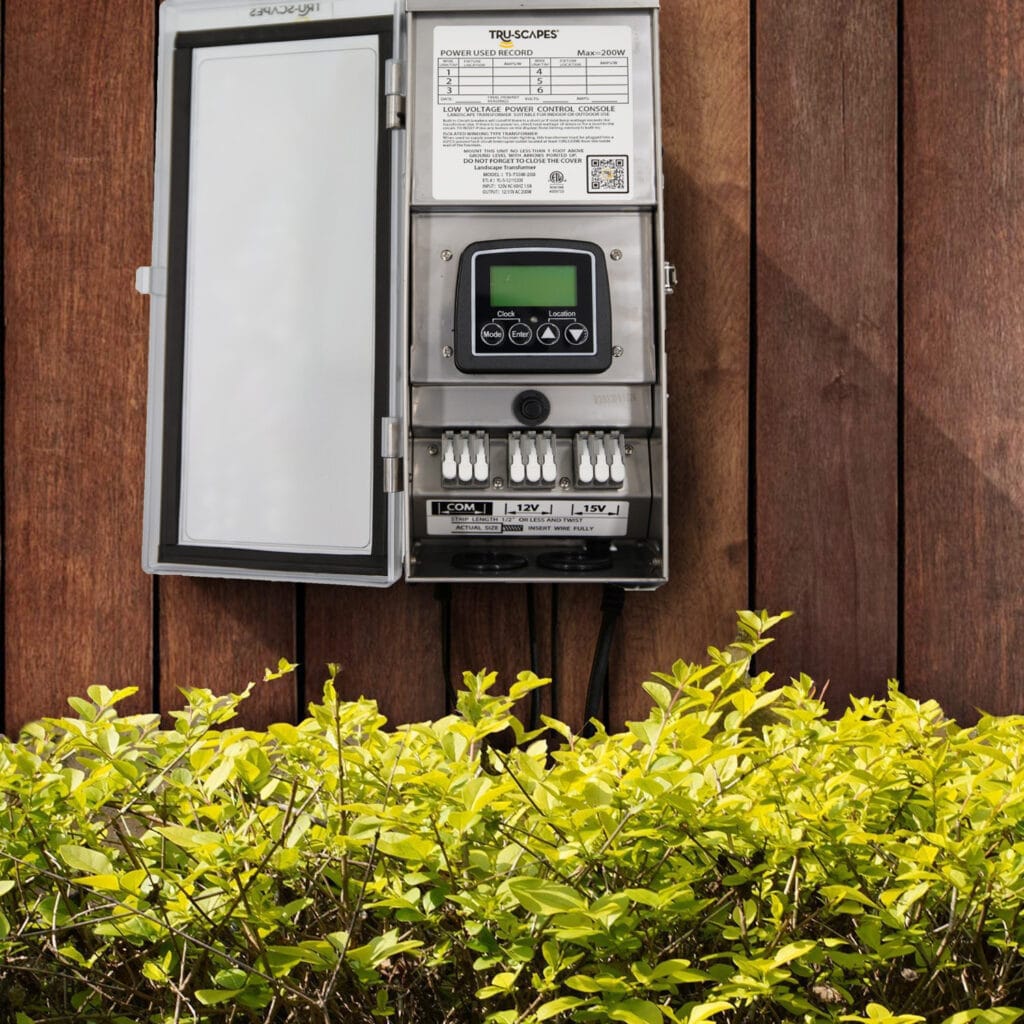
Inside its box, you typically find a few key components:
- Terminals: These are the screw-down posts where your low-voltage landscape wires connect. You will usually see a “Common” terminal and one or more “Voltage” terminals (e.g., 12V, 13V, 15V).
- Timer/Photocell: Most transformers have a way to turn on and off automatically. This is often a built-in timer (digital or mechanical) or a small photocell that detects when it gets dark.
- Internal Breaker: A built-in safety feature, like the breakers in your house. If the system draws too much power, this internal breaker will trip.
The Core Methodology for Low Voltage Transformer Testing
Okay, the simple fixes did not work. Now we need to determine if power is getting to the transformer and if power is getting out of it.
For this, you will need one simple tool: a multimeter. It’s wise to review how to safely use a multimeter before you begin. You can get an inexpensive digital multimeter from any hardware store. It is an essential tool for any homeowner.
Set your multimeter to read AC Voltage (V~ or ACV).
Step 1: Test the Transformer’s Timer and Photocell
Sometimes, the transformer is fine, but the controls are not.
- If you have a timer: Is it set correctly? Is the time of day accurate? Many digital timers have an internal battery that can die. Try setting the transformer to “On” (manual override) to bypass the timer schedule.
- If you have a photocell: Is it dirty? Wipe it clean of any dust, pollen, or spiderwebs. A dirty photocell can think it is daytime. To test it, cover the photocell completely with thick black tape. Wait about two minutes. This should trick the transformer into thinking it is night, and it should turn on.
If bypassing the timer or photocell turns the lights on, you have found your problem. You need to replace the photocell or fix the timer.
Step 2: Test for Input Voltage (120V)
Now we check if household power is reaching the transformer.
- Make sure the transformer is plugged in and the GFCI/breaker is reset.
- Set your multimeter to the ACV 200 setting (or the one above 120V).
- If the transformer has a power cord: Carefully touch the multimeter’s two probes to the two flat prongs of the power cord that is plugged into the wall. (This can be tricky; it is easier to use a socket tester).
- If the transformer is hardwired: STOP. This is a job for a professional electrician. Do not open a hardwired 120V junction box.
- The easier way: Plug a lamp or any other small appliance you know works into the same outlet as the transformer. Does it turn on? If yes, the outlet is working, and power is available.
If you have no power at the outlet, the problem is not your transformer. It is your home’s wiring, the GFCI, or the breaker.
Step 3: Test for Output Voltage (12V)
This is the definitive test. It tells you if the transformer is doing its job. We will now check the low-voltage terminal block.
- Open the transformer’s door or cover to access the terminal posts where your landscape wires are connected.
- Your lights should be on for this test (or set to “On”).
- Set your multimeter to the ACV 20 setting (or the one above 12V).
- Touch one multimeter probe to the “Common” terminal.
- Touch the other probe to the 12V (or 15V) terminal that your wires are connected to.
- You must make a good, clean connection. Touch the metal probe tip directly to the metal terminal post or the metal screw head.
Step 4: Interpret the Results
Your multimeter reading tells you the story. This table breaks down what you are seeing.
Interpreting Your Multimeter Readings
| Reading Location | Expected Voltage | What Your Reading Means |
| Output Terminals | ~11.5V – 15V AC | Good! Your transformer is working perfectly. The problem is “downstream” in your wiring or fixtures. |
| Output Terminals | 0V AC | No power output. This means your transformer is likely a non-functional landscape lighting transformer. It could be a tripped internal breaker, a failed timer, or a dead unit. |
| Output Terminals | <10V AC | Low voltage. This could mean the transformer is failing, or it is severely overloaded (too many lights). |
| Output Terminals | Reading is erratic | The transformer is likely failing. |
If you get 0V or a very low reading, try one more thing: look for a small reset button on the transformer itself, often near the terminals. Press it and test again. If you still get 0V, and you are 100% sure the 120V outlet is working, the transformer is dead.
What to Do if Your Transformer Is Working?
What if your multimeter read a healthy 12V-15V? This is good news and bad news. Your transformer is fine, but the problem lies elsewhere. The most common issues, which fall under general landscape lighting maintenance, are:
- A cut wire: This is very common after gardening, digging, or edging. Look for any areas where you may have recently disturbed the ground.
- A bad connection: Low-voltage wire connections can corrode or come loose over time. Check the connections at the first light fixture in the run.
- A faulty fixture: One bad, shorted-out fixture can sometimes take down the entire line.
- System Overload: This is a big one. Let’s dive into it.
The Common Culprit: System Overload
A transformer has a maximum capacity, measured in watts (e.g., 150W, 300W, 600W). If you put too many lights on it, it will either trip its internal breaker or fail prematurely.
This often looks like a non-functional landscape lighting transformer, but it is actually a design problem.
- Find your transformer’s wattage: It is printed on the unit.
- Calculate your system’s load: Go to every light fixture. Find the wattage of the bulb (e.g., 5W, 7W).
- Add it all up: Add the wattage of every single bulb connected to that transformer.
- Do the math: A safe system should only use 80% of the transformer’s total capacity. (You can see more in our power reference guide on this.)
- Example: You have a 300W transformer. 80% of 300 is 240W. If your bulbs add up to 250W, you are overloaded.
If you are overloaded, your transformer’s internal breaker will constantly trip to protect itself. This is why your lights may work for a few minutes and then shut off. The solution is to either remove some fixtures or upgrade to a higher-capacity transformer.
When to Upgrade to a Modern Transformer
If your tests show your old transformer is dead, or if it is an old, inefficient magnetic model that hums loudly, it is time for an upgrade.
A high-quality, modern transformer is the cornerstone of a reliable and beautiful lighting system. When shopping for a replacement, look for:
- Stainless Steel Casing: Resists rust and corrosion for years.
- Multi-Tap Terminals: Having 12V, 13V, 14V, and 15V taps allows your installer to compensate for voltage drop on long wire runs, ensuring all lights are equally bright.
- Reliable Timer/Photocell: Look for models with built-in digital timers and photocell options for “dusk-to-dawn” operation.
- Solid Warranty: A good manufacturer stands by its product.
At Tru-Scapes, our professional-grade transformers are built for contractors and homeowners who demand reliability. They are engineered to be the dependable heart of your system, providing clean, consistent power to keep your landscape glowing night after night.
Your Troubleshooting Journey Is Complete
Troubleshooting your landscape lighting does not have to be a mystery. By following a logical, step-by-step process, you can isolate the problem like a pro.
To recap our landscape lighting transformer troubleshooting methodology:
- Check the Simple Stuff: Breakers and GFCI outlets.
- Check the Controls: Timers and photocells.
- Test the Input: Ensure 120V power is getting to the transformer.
- Test the Output: Use a multimeter to see if 12V-15V power is getting out.
This process will tell you if the problem is your power source, your transformer, or your downstream wiring. With a little patience, you can get to the bottom of the issue and restore that magical ambiance to your outdoor space.
Have you ever had a landscape lighting mystery? What was the culprit? Share your stories or questions in the comments below.