Transforming your outdoor space after dark doesn’t require complex electrical work or contractor-level expertise anymore. Low voltage landscape lighting has revolutionized how homeowners approach outdoor illumination, delivering professional results through accessible, energy-efficient systems that anyone can install over a weekend. Whether you’re highlighting architectural features, improving nighttime safety along walkways, or creating ambiance in garden spaces, understanding how these 12-volt systems work will help you make informed decisions about design, equipment selection, and long-term maintenance.
Key Takeaways
- Low voltage landscape lighting systems operate at 12 volts, reducing shock risk and installation complexity
- Professional-grade LED landscape lights use 80% less energy than halogen alternatives
- Proper transformer sizing prevents voltage drop and ensures consistent brightness across all fixtures
- Installation costs range 30–50% lower than line-voltage systems due to simpler wiring requirements
- Strategic uplighting for trees and pathway lighting creates layered, dynamic outdoor spaces
- Most systems qualify for DIY installation without electrical permits in residential settings
What Makes Low Voltage Landscape Lighting Different
Low voltage systems operate at 12 volts rather than the standard 120 volts used in household circuits. A landscape lighting transformer steps down regular electrical current to this safer voltage, which then powers fixtures throughout your property via buried cables.
This fundamental difference creates several practical advantages. The reduced voltage eliminates the severe shock hazard associated with standard electrical systems, allowing homeowners to handle wiring and fixtures without the same safety concerns. Installation becomes significantly simpler since most jurisdictions don’t require permits or licensed electricians for 12-volt outdoor systems.
How the System Works
The transformer serves as the system’s heart, connecting to a standard outdoor outlet or dedicated circuit. From there, low-gauge wire runs underground to individual fixtures, which connect via simple twist-on connectors or quick-clip mechanisms. Unlike line-voltage systems requiring conduit and junction boxes, low voltage wiring can be buried directly in shallow trenches.
Comparison: Low Voltage vs. Line Voltage Systems
| Feature | Low Voltage (12V) | Line Voltage (120V) |
|---|---|---|
| Installation difficulty | DIY-friendly | Requires licensed electrician |
| Safety risk | Minimal shock hazard | Serious injury potential |
| Permit requirements | Usually none | Required in most areas |
| Energy efficiency | High (especially LED) | Moderate to low |
| Fixture cost | $15–$150 per unit | $40–$300 per unit |
| Operating cost | $2–$8 per fixture yearly | $12–$45 per fixture yearly |
| Wire burial depth | 6 inches typical | 18 inches minimum |
| Expandability | Simple additions | Complex modifications |
Choosing the Right Landscape Lighting Transformer
The transformer determines your system’s capacity, reliability, and expansion potential. Selecting the correct size requires calculating total wattage across all planned fixtures, then adding 20–30% overhead for voltage stability and future additions.
Transformer Sizing Formula
- List every fixture with its wattage rating
- Add all wattages together for total load
- Multiply by 1.25 to account for efficiency loss
- Round up to the next standard transformer size
For example, if you plan fifteen 3-watt LED pathway lights (45 watts) and six 5-watt uplighting fixtures (30 watts), your calculation looks like this: 75 watts × 1.25 = 93.75 watts. You’d choose a 120-watt or 150-watt transformer.
For a detailed walkthrough of this process, see our guide to sizing your landscape lighting transformer.
Transformer Features Worth Considering
Multi-tap outputs allow you to connect different wire runs at various voltage points, compensating for voltage drop over distance. This feature becomes essential when fixtures sit more than 100 feet from the transformer.
Built-in timers and photocells automate operation, though smart-home compatibility now offers superior control through smartphone apps and voice commands. Many homeowners prefer separate smart plugs or controllers for greater flexibility. Learn how to configure these controls in our instructional guide to landscape lighting timers.
Stainless steel or weatherproof enclosures extend transformer life in harsh climates. Cheaper plastic housings may crack after several freeze-thaw cycles or degrade under intense UV exposure.
Professional Landscape Lighting Design Principles
Effective outdoor lighting balances aesthetics, functionality, and energy efficiency through layered illumination strategies. Professional landscape lighting designers follow specific principles that homeowners can adapt for their own projects.
The Three-Layer Approach
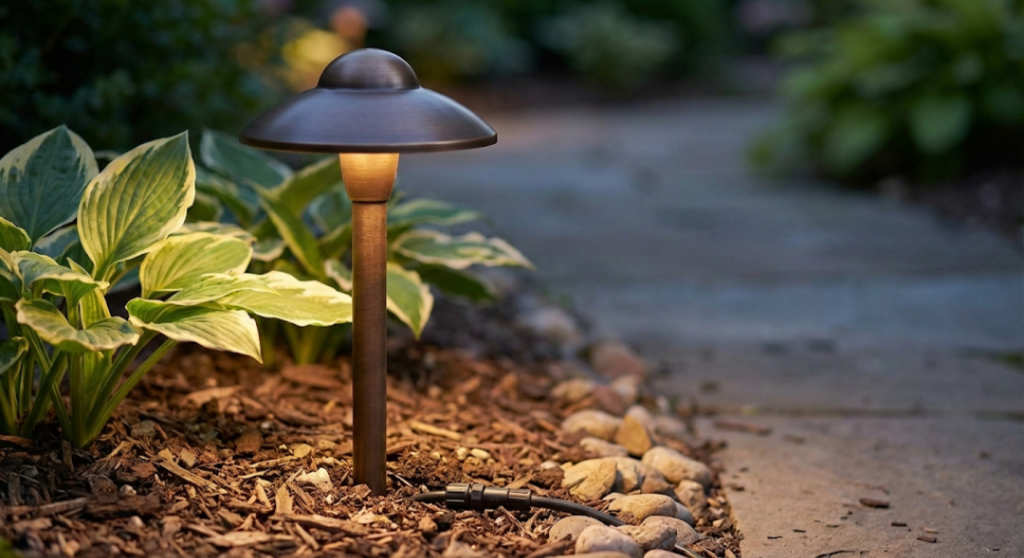
Ambient lighting provides overall visibility and safety. Pathway landscape lights along walkways, driveways, and stairs fall into this category, typically spaced 8–10 feet apart for continuous coverage without harsh brightness.
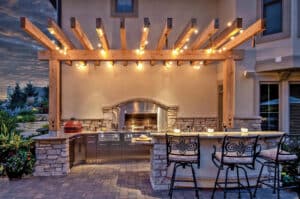
Task lighting illuminates specific functional areas like outdoor kitchens, dining spaces, or entry points. These fixtures require higher output than ambient lighting but should still avoid glare.
Accent lighting creates visual interest by highlighting architectural features, specimen plants, or water features. Uplighting for trees, for instance, casts dramatic shadows and emphasizes vertical elements in your landscape.
Common Design Mistakes to Avoid
| Do | Don’t |
|---|---|
| Position fixtures to light the subject, not viewers | Aim lights where they’ll create glare |
| Use multiple low-wattage fixtures for even coverage | Rely on a few high-wattage “spotlight” fixtures |
| Conceal fixtures in plantings or behind objects | Place fixtures prominently in view |
| Match color temperature across related areas | Mix warm and cool LED temperatures randomly |
| Plan for plant growth over 3–5 years | Design only for current landscape size |
| Test fixture placement before final installation | Commit to positions without night testing |
Strategic Placement Techniques
Downlighting from elevated positions mimics natural moonlight, creating soft illumination across larger areas. This approach works particularly well for illuminating patios, decks, or seating areas from overhead structures. For a step-by-step tutorial on achieving this effect, explore our guide on how to achieve a moonlighting effect with downlighting techniques.
Grazing places fixtures close to textured surfaces like stone walls or tree bark, emphasizing dimensional qualities through shadow play. Position fixtures 6–12 inches from the surface with narrow beam spreads.
Silhouetting backlights interesting plant shapes against walls or fences, creating dramatic outline effects. This technique works best with plants that have distinctive forms—Japanese maples, ornamental grasses, or sculptural succulents.
LED Landscape Lights: The Modern Standard
LED technology has fundamentally changed outdoor landscape lighting, offering dramatic improvements in energy efficiency, longevity, and design flexibility compared to older halogen and incandescent options.
Quantifiable LED Advantages
Modern LED landscape lights consume approximately 80% less energy than equivalent halogen fixtures. A 3-watt LED produces comparable light output to a 20-watt halogen bulb, translating to substantial savings over time. With operational lifespans reaching 50,000 hours, LEDs can function for 15–20 years under typical use patterns before requiring replacement.
For more on energy performance, refer to the U.S. Department of Energy’s guide to LED lighting.
Color Temperature Considerations
Color temperature, measured in Kelvin, dramatically affects the mood and appearance of illuminated spaces. Most outdoor applications work best within specific ranges:
2700K–3000K (Warm White): Creates inviting, traditional ambiance similar to incandescent lighting. This range complements warm-toned materials like wood, brick, and copper while making plantings appear natural.
3500K–4000K (Neutral White): Balances warm and cool tones, working well for contemporary designs or when illuminating mixed material palettes. This temperature range provides clearer visibility for task lighting applications.
5000K+ (Cool White): Produces crisp, bluish light that can appear harsh in residential settings. Generally reserved for security applications or modern architectural designs where stark contrast is desired.
To select the ideal tone for your yard, consult our full guide to choosing the right color temperature for your landscape.
Beam Angle Selection
Narrow beams (15–30 degrees) concentrate light for accent applications like uplighting for trees or highlighting specific architectural details. Medium beams (35–60 degrees) suit general pathway lighting and smaller garden areas. Wide beams (60–120 degrees) provide ambient coverage for larger spaces or downlighting applications.
Installing Low Voltage Landscape Lighting: Step-by-Step
While low voltage systems accommodate DIY installation, following proper procedures ensures optimal performance and longevity.
Step 1: Create Your Lighting Plan
Walk your property at dusk to identify areas needing illumination. Mark potential fixture locations with flags or stakes, then return after full darkness to evaluate spacing and coverage. Take photos from different vantage points to assess overall composition.
Step 2: Calculate Wire Runs and Voltage Drop
Voltage drop—the reduction in voltage over distance—represents the primary technical challenge in low voltage systems. Use 12-gauge wire for runs over 100 feet or when powering multiple fixtures on one line. Calculate voltage drop using online calculators provided by manufacturers or the Illuminating Engineering Society standards.
If fixtures at the end of a run receive significantly less voltage than those near the transformer, they’ll appear noticeably dimmer. Combat this through proper wire sizing, shorter runs, or using transformers with multi-tap outputs. For a complete breakdown of causes and fixes, see our guide on how to fix voltage drop in your low-voltage lighting system.
Step 3: Install the Transformer
Mount the transformer near an outdoor GFCI outlet, following manufacturer specifications for clearance and ventilation. Position it where you can easily access the timer controls but not where it’s prominently visible. Many installers place transformers behind shrubs, in utility areas, or inside garages with wire running through small holes.
Step 4: Bury Wire and Place Fixtures
Dig trenches 6–8 inches deep along planned routes. Lay wire without stretching it tight—leave slight slack to accommodate ground movement and future adjustments. Most outdoor landscape lighting uses direct-burial cable that doesn’t require conduit, though protecting wire under driveways or high-traffic areas with PVC conduit prevents damage.
Position garden lighting fixtures and pathway landscape lights according to your plan, connecting them to the main wire runs using the manufacturer’s connector system. Avoid piercing-style connectors that can corrode; heat-shrink or silicone-filled connectors provide superior long-term reliability.
Step 5: Test and Adjust
Power the system and evaluate results after dark. Adjust fixture angles, reposition units that create unwanted glare or shadows, and fine-tune timer settings. Most landscape lighting designs require minor modifications after seeing the actual nighttime effect.
Step 6: Backfill and Document
Once satisfied with placement and performance, carefully backfill trenches and document wire paths with photos or drawings. This documentation proves invaluable for future maintenance or modifications.
Low Voltage Landscape Lighting Kits vs. Custom Systems
Homeowners face a fundamental choice between purchasing pre-packaged landscape lighting kits or assembling custom systems from individual components.
Landscape Lighting Kits: Pros and Cons
Pros:
- Complete compatibility between transformer, fixtures, and wire
- Simplified decision-making for beginners
- Often includes basic installation instructions and design tips
- Lower initial cost for small projects (4–8 fixtures)
- Single purchase simplifies ordering and returns
Cons:
- Limited fixture style options restrict design flexibility
- May include lower-quality components to meet price points
- Difficult to expand beyond kit’s transformer capacity
- One-size-fits-all approach doesn’t accommodate unique property layouts
- Wire gauge may be inadequate for optimal spacing
When to Choose Custom Systems
If you have specific aesthetic goals, existing lighting that you’re expanding, or properties larger than 2,500 square feet of illuminated area, custom component selection typically delivers better results. Custom systems allow you to choose professional landscape lighting fixtures designed for specific applications—path lights optimized for walkways, well lights for uplighting, accent lights for architectural features—rather than compromising with multi-purpose kit fixtures.
For small starter projects (6–10 fixtures illuminating a single area), quality landscape lighting kits from reputable manufacturers provide excellent value and simplified installation.
Maintenance and Troubleshooting
Low voltage systems require minimal maintenance but benefit from periodic attention to maintain optimal performance.
Annual Maintenance Checklist
- Clean fixture lenses and housings to remove dirt, spider webs, and mineral deposits
- Check all connections for corrosion or looseness
- Trim vegetation that’s grown to block or obscure fixtures
- Verify timer settings and adjust for seasonal daylight changes
- Test ground fault protection on the circuit supplying the transformer
- Inspect wire paths for damage from landscaping activity or settling
Common Problems and Solutions
Dim or flickering lights: Usually indicates voltage drop from inadequate wire gauge, corroded connections, or an overloaded transformer. Check voltage at problematic fixtures with a multimeter—readings below 10.5 volts suggest voltage drop issues. If the transformer itself is suspect, follow our step-by-step landscape lighting transformer troubleshooting guide.
Complete section failure: Examine the main wire run for breaks or severe corrosion at connection points. Use a continuity tester to locate breaks in buried wire.
Individual fixture failure: Modern LED fixtures rarely fail completely. Check the fixture connection first, then test the fixture on a different connection point to determine whether the fixture or the wire tap has failed.
Inconsistent brightness across fixtures: May result from mixed fixture types with different wattages on the same run, voltage drop affecting distant fixtures, or LED drivers failing in individual units.
Specialized Applications and Advanced Techniques
Uplighting for Trees
Uplighting creates dramatic nighttime focal points by washing light up tree trunks and into canopies. Position fixtures 12–24 inches from the trunk, angling at 30–45 degrees to emphasize bark texture and branching structure. For trees with interesting branch patterns, use multiple fixtures from different angles to eliminate flat, one-dimensional illumination.
Deciduous trees require seasonal adjustment—closer placement during summer fullness, pulled back slightly in winter to prevent excessive brightness on bare branches. Evergreens maintain consistent appearance year-round, making them ideal candidates for permanent uplighting installations. Master this technique with our guide on how to perfectly highlight trees with uplighting.
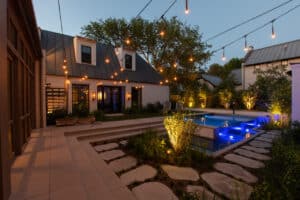
Water Feature Illumination
Underwater lights transform fountains, ponds, and waterfalls into nighttime attractions, but require specialized waterproof fixtures rated for submersion. Position lights behind or beneath falling water to create glowing effects, or angle them across pond surfaces to catch ripples and movement.
Coordinate water feature lighting with surrounding landscape elements—uplighting nearby plants or hardscape creates context and integration rather than isolated bright spots floating in darkness. See our full guide on how to illuminate water features with landscape lighting.
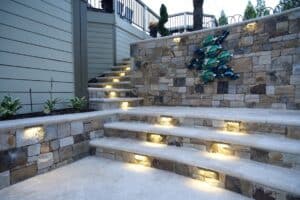
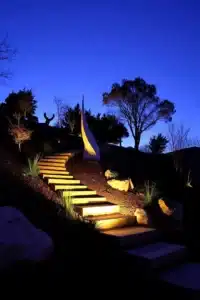
Path and Step Lighting Safety Standards
Pathway landscape lights should provide sufficient illumination for safe navigation without creating glare or light pollution. The Illuminating Engineering Society recommends minimum 0.5 foot-candles on walking surfaces with 3:1 maximum to minimum uniformity ratios.
Translate these standards to practical installation by spacing path lights 8–10 feet apart for 3–4 watt LED fixtures with 60-degree beam spreads. Stairs require illumination at each tread or riser, with fixtures positioned to eliminate shadows that could obscure step edges. For critical safety guidance, read our article on the critical role of outdoor step lighting.
Cost Analysis: Investment and Operating Expenses
Understanding the complete financial picture helps homeowners budget appropriately for outdoor landscape lighting projects.
Initial Investment Breakdown
A typical residential installation covering front yard pathways, entry area accent lighting, and several uplighting features requires:
- Transformer (200–300 watt capacity): $120–$280
- Fixtures (12–20 units): $400–$2,400
- Wire and connectors: $80–$150
- Installation labor (if hiring professionals): $500–$1,200
Total investment for professional landscape lighting typically ranges from $1,100 to $4,000, with DIY installations eliminating the labor component.
Operating Cost Calculations
LED landscape lights dramatically reduce ongoing expenses compared to older technologies. A 3-watt LED fixture operating six hours nightly costs approximately $1.20–$2.50 annually at average electricity rates. By comparison, a 20-watt halogen equivalent costs $8–$17 annually.
For a 16-fixture system running year-round, annual operating costs range from $20–$40 with LEDs versus $130–$270 with halogens. The LED system pays for its higher initial fixture cost within 2–3 years through energy savings alone.
Environmental Considerations and Dark Sky Principles
Responsible outdoor lighting design minimizes light pollution, reduces energy consumption, and protects nocturnal ecosystems.
Dark Sky Compliance
The International Dark-Sky Association provides guidelines for reducing light pollution while maintaining functional outdoor illumination. Key principles include:
- Directing light downward with shielded fixtures to prevent upward light spill
- Using the minimum intensity necessary for safety and aesthetics
- Employing warm color temperatures (3000K or lower) that cause less sky glow
- Installing timers or motion sensors to limit operating hours
If you live near observatories, nature preserves, or designated dark sky communities, check local ordinances that may regulate outdoor lighting intensity, direction, and hours of operation.
Wildlife Impact Considerations
Artificial nighttime lighting affects insect populations, bird migration patterns, and mammal behaviors. Minimize ecological disruption by limiting the number of fixtures, avoiding illumination of large areas unnecessarily, and switching off decorative lighting during migration seasons if your property lies along flyways.
Smart Integration and Automation
Modern low voltage systems integrate seamlessly with smart home platforms, offering sophisticated control beyond basic timers.
Smart Controller Capabilities
Contemporary landscape lighting controllers connect via WiFi or hub systems to provide:
- Smartphone control from anywhere with internet access
- Zone-based programming for different areas on independent schedules
- Dimming capabilities to adjust brightness based on activity or moon phase
- Sunrise/sunset tracking that automatically adjusts seasonal timing
- Integration with security systems to respond to motion detection
- Voice control through Amazon Alexa, Google Assistant, or Apple HomeKit
Learn how to set up your system with our guide on how to integrate smart control into your landscape lighting.
Conditional Automation Examples
If you frequently host evening gatherings, program a “party mode” scene that increases pathway lighting intensity and activates accent lighting while dimming decorative fixtures to reduce glare.
If security is a concern, integrate landscape lighting with motion sensors so that movement triggers full brightness across multiple zones, deterring intruders while alerting household members.
Quick Answers – FAQ Section
How long do low voltage landscape lights last?
Quality LED landscape lights operate for 50,000+ hours, translating to 15–20 years of typical use (6 hours nightly) before requiring bulb or fixture replacement.
Can I install low voltage landscape lighting myself?
Yes—low voltage systems are designed for DIY installation, typically requiring no permits or special electrical knowledge since they operate at safe 12-volt levels rather than dangerous 120-volt household current.
What size transformer do I need for landscape lighting?
Calculate total fixture wattage, multiply by 1.25 for efficiency overhead, and select the next larger standard transformer size; most residential installations use 150–300 watt transformers. For a detailed walkthrough, see our guide to sizing your landscape lighting transformer.
How deep should I bury landscape lighting wire?
Bury low voltage wire 6–8 inches deep in most areas, using PVC conduit for protection under driveways, walkways, or anywhere subject to digging or mechanical stress.
Are LED landscape lights worth the higher initial cost?
Absolutely—LED fixtures consume 80% less energy than halogens, last 10–15 times longer, and typically recoup their cost premium within 2–3 years through reduced electricity bills and replacement expenses.
How far apart should pathway lights be spaced?
Space pathway landscape lights 8–10 feet apart for standard 3–4 watt LED fixtures, adjusting closer (6–8 feet) in areas requiring extra visibility like stairs or uneven terrain.
Do landscape lights work in cold climates?
Modern LED landscape lights function reliably in temperatures from -40°F to 140°F; however, transformer placement may require indoor or sheltered locations in extreme cold regions.
Can I mix different fixture styles on one transformer?
Yes—you can connect various fixture types to a single transformer as long as total wattage remains below the transformer’s capacity and you account for voltage drop over distance.
How much does professional landscape lighting installation cost?
Professional installation typically costs $1,500–$5,000 for average residential properties, including materials and labor, with pricing varying by property size, fixture quantity, and installation complexity.
What color temperature is best for landscape lighting?
Most residential applications look best with warm white (2700K–3000K) LEDs that create inviting ambiance and complement traditional materials, though modern designs may use neutral white (3500K–4000K) effectively. Explore your options in our color temperature guide.
Glossary of Terms
Voltage drop: The reduction in electrical voltage that occurs as current travels through wire over distance, resulting in dimmer lights at the end of wire runs if not properly addressed through appropriate wire gauge selection.
Transformer: An electrical device that converts standard 120-volt household current to 12 volts for safe operation of low voltage landscape lighting systems, typically including timer controls and multiple output terminals.
Beam angle: The measurement in degrees that describes the spread of light from a fixture, ranging from narrow spot beams (15–30°) for accent lighting to wide flood patterns (60–120°) for ambient illumination.
Lumen: The unit of measurement for the total amount of visible light emitted by a source, replacing wattage as the standard measure of LED fixture brightness since wattage only indicates energy consumption.

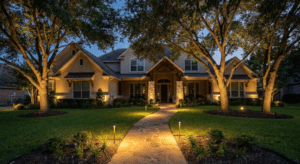
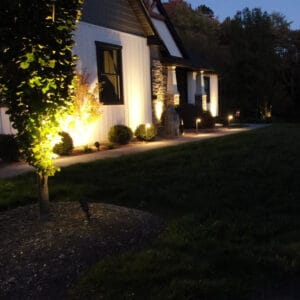
Real-World Application: Suburban Front Yard Transformation
A homeowner in suburban Ohio approached landscape lighting with two primary goals: improving nighttime curb appeal and illuminating the walkway to their front door for safety. Their 2,400-square-foot lot featured mature oak trees flanking the entry, a 40-foot curved walkway, and foundation plantings along the home’s facade.
The installation included eight pathway landscape lights spaced at 8-foot intervals along the curved walk, three uplight fixtures positioned to wash the oak trees from different angles, and four accent fixtures highlighting architectural columns and the entry door. A 200-watt transformer with three-zone output powered the system through two wire runs—one serving pathway lights, another serving the accent and uplighting fixtures.
Total project cost reached $1,400 for DIY installation, including a quality transformer, professional-grade LED fixtures, wire, and connectors. The system operates on a timer from dusk until 11 PM, with a separate zone keeping pathway lights active until dawn. Monthly electricity cost runs approximately $3.50, and the installation immediately improved home security while creating an inviting nighttime presence that neighbors commented on favorably.
Conclusion
Low voltage landscape lighting delivers professional-quality outdoor illumination through accessible, energy-efficient systems that homeowners can design and install themselves. By understanding transformer sizing, embracing LED technology, following strategic design principles, and implementing proper installation techniques, you can transform your property’s nighttime appearance while improving safety and security. The combination of lower operating costs, extended fixture lifespan, and flexible design options makes low voltage systems the clear choice for residential landscape lighting in 2026.
Ready to illuminate your outdoor spaces? Start by walking your property at night, identifying areas that would benefit from lighting, and sketching a simple plan showing fixture locations and wire paths. Whether you choose a starter kit or assemble a custom system, the investment in quality components and thoughtful design will deliver years of reliable performance and enhanced enjoyment of your outdoor environment.