Have you ever walked through a garden at night and felt as if the moon was casting a magical glow over everything? That’s the moonlighting effect – a lighting technique designed to mimic the soft, natural shimmer of moonlight. In this guide, you’ll learn how to use low-voltage downlighting to create that enchanting ambiance in your own outdoor space. Whether you’re a homeowner looking to elevate your backyard or a design enthusiast seeking a unique aesthetic, these practical tips will help you transform your landscape into a serene and sophisticated nighttime retreat.
What Is the Moonlighting Effect?
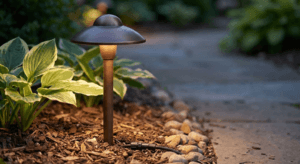
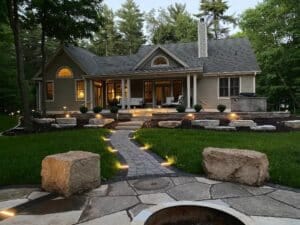
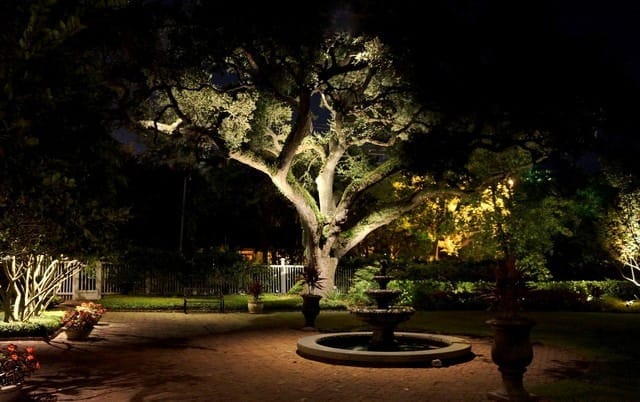
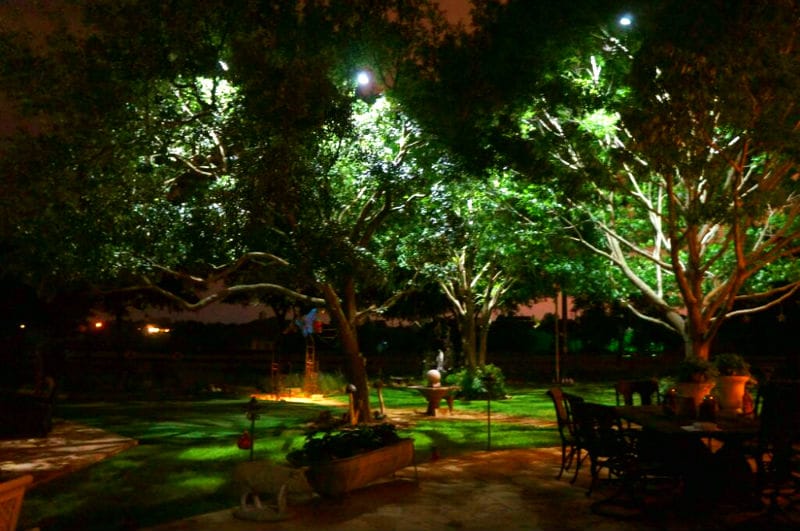
The moonlighting effect is a lighting technique that recreates the soft, diffused glow of natural moonlight in outdoor settings. By strategically placing fixtures high in trees or on elevated structures, soft beams are cast downward to produce dappled light patterns on the ground. Often achieved through downlighting, this method subtly illuminates pathways, plants, patios, and other key features – enhancing visibility while preserving a calm, understated aesthetic.
At Tru-Scapes, we specialize in outdoor lighting solutions that elevate both the beauty and functionality of your home. The moonlighting effect is one of our favorite ways to add charm and character to your landscape – and it’s easier to achieve than you might expect.
Why Choose Downlighting for the Moonlighting Effect?
Downlighting is the cornerstone of the moonlighting effect. Unlike uplighting – which sends light upward to highlight trees or structures – downlighting casts light downward from an elevated point. The result is a soft, even glow that mimics the natural radiance of moonlight. Here’s why it’s a game-changer for homeowners:
- Subtle Elegance: Creates a warm, inviting atmosphere without harsh glare.
- Versatility: Suitable for compact yards or expansive landscapes.
- Safety and Functionality: Gently lights pathways and seating areas without overwhelming the scene.
- Low Maintenance: Tru-Scapes’ high-quality fixtures are durable and built to withstand the elements.
Ready to transform your outdoor space? Let’s dive into the step-by-step process of creating the moonlighting effect with downlighting techniques.
Step-by-Step Guide to Creating the Moonlighting Effect
Step 1: Plan Your Lighting Layout
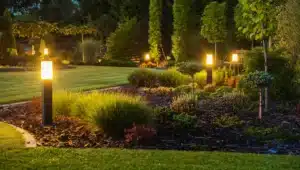
Before installing any fixtures, take time to map out your space. Walk through your yard at night to identify focal points – such as trees, shrubs, or seating areas. Ask yourself: Where do I want the moonlit glow to fall? A thoughtful plan ensures your lighting feels intentional and cohesive.
- Choose Elevated Positions: Use sturdy trees or tall structures (like pergolas) to mount fixtures. Aim for heights between 15 and 30 feet for best results.
- Highlight Key Areas: Illuminate pathways, garden beds, or seating areas to enhance balance and depth.
- Consider Shadows: The moonlighting effect relies on soft, dappled shadows. Position lights to shine through branches or foliage for a natural look.
Pro Tip: Sketch a simple layout of your yard and note light placements. This will help you avoid over-lighting and better visualize the final design.
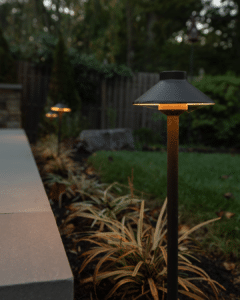
Step 2: Select the Right Fixtures
Selecting the right fixtures is key to creating a convincing moonlighting effect. At Tru-Scapes, we recommend LED landscape lights for their energy-efficient lighting and longevity, as supported by energy-efficient lighting standards from the U.S. General Services Administration. Research from the California Lighting Technology Center also supports the superior outdoor performance of LEDs. Key features to look for:
- Wide Beam Spread: Use fixtures with a 60° or wider beam to simulate moonlight’s diffused glow.
- Warm Color Temperature: Select bulbs in the 2700K–3000K range to achieve a soft, natural look.
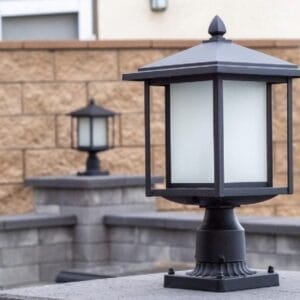
- Durable Materials: Opt for brass or copper construction to withstand outdoor conditions and maintain beauty over time.
Table: Comparing Downlighting Fixture Options
| Fixture Type | Pros | Cons | Best For |
|---|---|---|---|
| LED Downlights | Energy-efficient, long-lasting, customizable | Higher upfront cost | Modern landscapes, eco-conscious homeowners |
| Halogen Downlights | Lower initial cost, warm glow | Shorter lifespan, less efficient | Budget-friendly projects |
| Adjustable Spotlights | Flexible beam direction, versatile | Requires precise aiming | Dynamic, multi-feature yards |
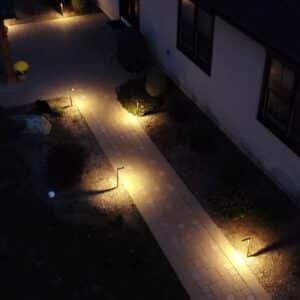
Step 3: Install Lights Safely and Strategically
Proper installation is essential for both safety and aesthetics. If you’re not comfortable with electrical work, consider hiring a professional – like the Tru-Scapes team – to ensure your setup meets safety standards. Follow these tips:
- Mount Securely: Use tree-safe straps or brackets to attach fixtures without harming branches.
- Aim Downward: Position lights to minimize glare and direct the beam toward the ground or key features.
- Hide Wiring: Tuck cables neatly along branches or bury them just below the surface for a polished appearance.
FAQ: How many lights do I need for the moonlighting effect? It depends on the size of your yard. A medium-sized space (1,000–2,000 sq. ft.) typically benefits from 3–5 downlights. Larger areas may require more, but avoid over-lighting – less is more when aiming for a natural moonlit effect.
Step 4: Test and Adjust
After installation, test your lighting setup at night to fine-tune the effect. Walk through your yard and look for overly bright or dark spots. Adjust the angle or brightness of your fixtures as needed to create the ideal moonlit atmosphere.
Pro Tip: Use dimmable lighting to control brightness precisely. This lets you customize the ambiance – whether it’s a calm evening or a festive gathering.
Common Mistakes to Avoid
While creating the moonlighting effect is simple, a few common mistakes can reduce its impact. Avoid these pitfalls:
- Over-Lighting: Using too many fixtures or excessively bright bulbs can overpower the soft, natural glow.
- Poor Placement: Lights positioned too low or aimed incorrectly may produce harsh shadows instead of gentle patterns.
- Ignoring Maintenance: Regularly inspect fixtures for debris, damage, or misalignment – especially after storms.
How Tru-Scapes Can Help
At Tru-Scapes, we’re passionate about bringing your outdoor vision to life. Our team specializes in personalized lighting design, including the moonlighting effect -tailored to your home’s unique layout and needs. Drawing on landscape lighting expertise from industry leaders, we use premium, durable lighting fixtures and handle everything from planning to installation so you can enjoy a stunning, hassle-free landscape.
As a U.S.-based company, we understand what American homeowners value: quality, durability, and a touch of elegance. Our past projects, featured on tru-scapes.com, show how we’ve turned backyards into beautiful nighttime retreats. Ready to get started? Contact us for a consultation and let us help bring your landscape to life.
FAQs About the Moonlighting Effect and Downlighting
Can I achieve the moonlighting effect in a small yard? Absolutely! Even a compact space can glow with 1–2 well-placed downlights. Focus on a single tree or a small patio to keep it simple. For more answers, check our FAQ page.
How much does it cost to install downlighting for the moonlighting effect? Costs vary based on yard size and fixture quality. For an accurate estimate, reach out to professionals like Tru-Scapes for a tailored quote.
Are LED lights the best choice for downlighting? LEDs are ideal due to their efficiency, longevity, and customizable brightness. They’re a smart investment for long-term beauty.
Conclusion
The moonlighting effect isn’t just a trend – it’s a timeless way to turn your outdoor space into a serene, moonlit retreat. With the right downlighting techniques, you can highlight your yard’s most beautiful features while creating a warm and welcoming atmosphere. From planning your layout to selecting the perfect fixtures, each step brings you closer to a landscape that feels magical every night.
Ready to bring the glow of moonlight to your backyard? Start small with a single downlight or go big with a custom Tru-Scapes design. Share your thoughts or questions in the comments, and don’t forget to check out more lighting tips at tru-scapes. Your dream outdoor space is just a glow away!