KEY TAKEAWAYS
- Successful low voltage landscape lighting installation starts with a wiring plan before any digging begins.
- Use a landscape lighting hub to simplify multi-zone wiring and reduce voltage drop across long runs. Learn more with our landscape lighting zone planning guide.
- Always connect your transformer to a GFCI-protected outdoor outlet rated for weatherproof use.
- LED landscape lights use 2W–10W per fixture, dramatically reducing transformer load versus halogen. Review our LED versus halogen fixture comparison for detailed performance data.
- Keep each wire run under 100 feet on 12 AWG cable to maintain consistent voltage at every fixture. See our voltage drop troubleshooting guide for long-run solutions.
- Bury all direct burial wire at least 6 inches deep to comply with most local electrical codes. Follow National Electrical Code low-voltage requirements for proper burial depth.

What You Need to Know Before You Start Installing Outdoor Landscape Lighting
Most outdoor lighting projects fail not because of bad fixtures or weak transformers — they fail because of poor planning. A crooked pathway, a dim uplight that should be bright, or a hub that trips the transformer breaker on the first cold night all trace back to decisions made — or skipped — before installation began.
Low voltage landscape lighting installation is one of the most rewarding DIY projects a homeowner can take on. The system runs on safe 12V current, requires no electrician for most installs, and can transform a plain yard into a professionally lit landscape after dark. But it does require understanding how wire runs, hubs, transformers, and fixture placement interact before you pick up a shovel.
This guide covers everything: how to lay out your design, run and connect wire correctly, use a hub to manage multiple zones, and follow the safety steps that protect both your system and your home. For comprehensive planning support, explore our landscape lighting outdoor system planning resource.
Planning Your Landscape Lighting Design Before Installation
Map Your Fixture Locations First
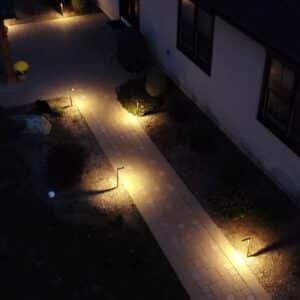
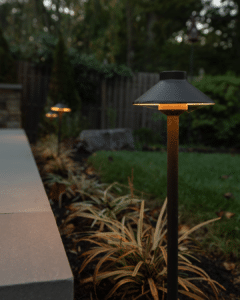
Before buying a single wire spool, walk your property at night with a flashlight. Note which areas feel unsafe or uninviting — the front walkway, the driveway edge, the base of a feature tree. These become your fixture anchor points for pathway landscape lights, uplighting for trees, and garden accent zones.
Sketch a rough map on paper. Mark the location of your outdoor electrical outlet (your transformer’s home base), every planned fixture, and the approximate wire path between them. This sketch becomes your wiring plan — the most important document in your entire installation. For specific placement guidance, see our pathway light placement and spacing guidelines and professional tree uplighting techniques.
Choose Your Wiring Method: Home-Run vs. Hub-and-Spoke
There are two primary wiring approaches for low voltage systems:
Home-run wiring connects each fixture or small group directly back to the transformer with its own wire run. It’s simple but creates a tangle of cables at the transformer and makes future changes difficult.
Hub-and-spoke wiring uses a central distribution hub placed in the middle of a fixture zone. One wire runs from the transformer to the hub; shorter individual wires branch out to each nearby fixture. This reduces total wire used, minimizes voltage drop, and makes zone management far cleaner. Learn strategic implementation in our landscape lighting zone planning guide.
If you need a straightforward install for a small front yard with 6–8 pathway landscape lights, home-run wiring works fine. If your project involves multiple zones — backyard, driveway, garden beds — a hub-based system will serve you better and scale more easily.
Tools and Materials You’ll Need
| Item | Purpose | Notes |
|---|---|---|
| Landscape lighting transformer | Powers the 12V system | Size to 120% of total fixture wattage using our landscape lighting transformer sizing guide |
| Direct burial 12 AWG wire | Main runs from transformer to hub/fixtures | Use 10 AWG for runs over 100 ft; see our outdoor wiring specification and repair guide |
| Landscape lighting hub | Distributes power to multiple fixture branches | Weatherproof models recommended; learn strategy in our landscape lighting zone planning guide |
| Wire connectors (quick-connect or gel-filled) | Joins wire to fixtures | Gel-filled prevents corrosion |
| Fixture stakes | Secures lights into ground | Match stake type to soil hardness |
| Flat spade or wire puller tool | Buries wire without trenching | Faster than manual trenching |
| Voltage meter / multimeter | Verifies voltage at each fixture | Essential for troubleshooting; see our voltage drop troubleshooting guide |
| GFCI outdoor outlet | Safe power source for transformer | Required by National Electrical Code low-voltage requirements |
Step-by-Step: How to Install Low Voltage Landscape Lighting
Step 1 — Mount the transformer.
Install your landscape lighting transformer on an exterior wall or post within 6 feet of your GFCI-protected outdoor outlet. Mount it at least 12 inches above ground to protect against water intrusion. Do not plug it in yet. Use our landscape lighting transformer sizing guide to verify proper capacity before installation.
Step 2 — Lay out your wire runs.
Unroll your direct burial wire along the planned path from the transformer (or hub location) to each fixture position. Do not cut yet — lay the full run first to confirm length and path before committing. Follow our outdoor wiring specification and repair guide for proper handling and protection.
Step 3 — Position your fixtures.
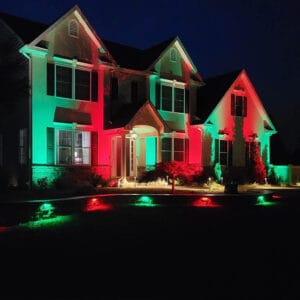
Place each fixture at its planned location. For pathway landscape lights, space them 8–10 feet apart for even coverage using our pathway light placement and spacing guidelines. For uplighting for trees, position the fixture 1–2 feet from the base of the trunk, angled upward at 45–60 degrees per our professional tree uplighting techniques.
Step 4 — Connect wire to fixtures.
Use your fixture’s quick-connect or terminal block connector to attach the wire. Maintain polarity — positive to positive, negative to negative. With gel-filled connectors, simply pierce the wire; the connector seals the connection against moisture automatically.
Step 5 — Install a hub if using hub-and-spoke wiring.
Place the hub centrally within the fixture zone. Run your main wire from the transformer to the hub’s input terminals. Connect each short fixture branch wire to an output port on the hub. Weatherproof hubs can be buried or left above ground depending on manufacturer guidance. Learn strategic placement in our landscape lighting zone planning guide.
Step 6 — Bury the wire.
Use a flat spade to slice a narrow trench 6–8 inches deep along your wire path. Lay the wire, fold the soil back, and tamp down. Avoid burying wire under structures where future access would be difficult. Mark buried runs on your property diagram for future reference. Always follow National Electrical Code low-voltage requirements for proper burial depth.
Step 7 — Connect wire to the transformer.
Strip approximately 3/4 inch of insulation from each wire end. Insert into the transformer’s terminal block and tighten the screw connections firmly. Double-check that no bare copper is exposed outside the terminal.
Step 8 — Set the timer and test.
Plug in the transformer. Set your timer or photocell to your preferred schedule. Walk the entire system and use a multimeter to verify voltage at the farthest fixture from the transformer. It should read between 10.8V and 12V. Adjust tap settings on your transformer if readings fall outside this range. For persistent inconsistencies, our voltage drop troubleshooting guide breaks down exactly how to recalibrate long runs.
Understanding Landscape Lighting Hubs: When and Why to Use One
A landscape lighting hub is a weatherproof junction box that accepts one input wire from the transformer and distributes power to multiple output branches — typically 6, 8, or 12 ports. Think of it as a power strip for your outdoor lighting circuit, positioned in the field rather than at the transformer.
Pros of Using a Hub
- Reduces total wire used by centralizing distribution
- Minimizes voltage drop across long fixture runs — see our voltage drop troubleshooting guide
- Simplifies troubleshooting — each branch is isolated
- Easier to add or remove fixtures without rewiring the main run
- Keeps the transformer cabinet clean and organized
Cons of Using a Hub
- Additional upfront cost versus direct wiring
- Hub must be weatherproofed and positioned correctly
- Failure at the hub affects all connected branches
- Adds one more connection point that requires occasional inspection
- If you need to light a large backyard with 20+ fixtures across multiple beds and trees, a hub-based system will outperform a home-run approach in every measurable way. If your install is a simple 8-light driveway border, a direct home-run to the transformer is perfectly adequate.
Wiring Safety: What Every DIY Installer Must Know
Do:
- Use only outdoor-rated, direct burial wire for all underground runs — see our outdoor wiring specification and repair guide
- Connect transformer to a GFCI-protected outlet following National Electrical Code low-voltage requirements
- Keep transformer at least 12 inches above ground level
- Verify voltage at the farthest fixture before finalizing the install using our voltage drop troubleshooting guide
- Mark all buried wire locations on a property diagram
- Use weatherproof wire connectors — gel-filled or heat-shrink types
Don’t:
- Run wire through standing water or flooded areas
- Overload the transformer beyond 80% of its rated capacity
- Use indoor extension cords as a power source
- Splice wire with standard household wire nuts — they allow moisture entry
- Bury wire less than 6 inches deep in high-traffic areas
- Connect low voltage wire to a standard 120V circuit
- The National Electrical Code (NEC) and most local jurisdictions require low voltage landscape wiring to be buried at a minimum depth of 6 inches. The Electrical Safety Foundation International (ESFI) recommends GFCI protection for all outdoor outlets, regardless of whether the connected equipment is low voltage.
LED vs. Halogen Fixtures: Impact on Your Wiring Plan
Choosing between LED landscape lights and halogen fixtures affects your wiring strategy more than most homeowners expect. According to U.S. Department of Energy LED performance data, modern LEDs dramatically cut power draw while maintaining equivalent or superior light output.
| Feature | LED Landscape Lights | Halogen Fixtures |
|---|---|---|
| Wattage per fixture | 2W–10W | 20W–50W |
| Transformer load (20 fixtures) | 40W–200W | 400W–1,000W |
| Bulb lifespan | 25,000–50,000 hours | 2,000–4,000 hours |
| Heat output | Low | High |
| Transformer compatibility | Check minimum load rating | Works with most transformers |
| Long-term energy cost | Low | High |
| Upfront fixture cost | Higher | Lower |
Many homeowners who switch from halogen to LED report being able to downsize their transformer significantly — sometimes by two full tiers.
This matters because a smaller, properly sized transformer is more efficient and longer-lasting than an oversized unit running at low load. Use our landscape lighting transformer sizing guide to recalculate after fixture upgrades.
However, some older landscape lighting transformers have a minimum load requirement.
Running exclusively LED landscape lights on an incompatible transformer can cause flickering or failure to operate. Always verify LED compatibility before mixing systems or upgrading fixtures on an existing install. Our LED versus halogen fixture comparison provides detailed compatibility guidance.
Installing Lighting Across a Split-Level Backyard
(Hypothetical scenario)
A homeowner in the Pacific Northwest had a backyard split into two levels: an upper deck area with garden lighting fixtures around raised beds, and a lower lawn with three mature trees and a stone pathway. The total fixture plan included 10 pathway landscape lights at 4W each, 3 uplights for trees at 7W each, and 4 garden accent fixtures at 5W each — a total load of 81W.
Rather than running five separate wire runs back to the transformer, the homeowner placed a weatherproof 8-port hub centrally between the two levels. One 50-foot main run connected the transformer to the hub. Short 15–25 foot branch runs reached each fixture cluster. The result: clean wiring, no voltage drop issues, and a transformer operating comfortably at 65% capacity — well within the recommended 80% ceiling.
Total wire used was roughly 40% less than a home-run approach would have required. For placement guidance on these fixture types, see our pathway light placement and spacing guidelines and professional tree uplighting techniques.
Quick Answers – FAQ
Q: Is low voltage landscape lighting installation safe for DIY?
A; Yes. Low voltage systems operate at 12V, which is safe to handle and does not require a licensed electrician for most residential installs. Always use a GFCI-protected outlet and follow local code requirements for wire burial depth. Review our low voltage landscape lighting installation guide for safe setup practices.
Q: How deep should low voltage landscape wire be buried?
A; Most local electrical codes and the National Electrical Code (NEC) require a minimum burial depth of 6 inches for low voltage direct burial wire. In areas with heavy foot traffic or lawn equipment use, 8 inches is safer. Always follow National Electrical Code low-voltage requirements for proper installation.
Q: Can I use any wire for low voltage landscape lighting?
A; No. You must use wire rated for direct burial outdoor use. Standard indoor wire lacks the moisture-resistant jacket required for underground installation and will corrode or fail prematurely. See our outdoor wiring specification and repair guide for proper material selection.
Q: How many fixtures can I connect to one hub port?
A; This depends on the wattage of your fixtures and the hub’s per-port rating. Most hubs are rated for the transformer’s total output distributed across ports — always check the manufacturer’s per-port wattage limit before connecting multiple fixtures to a single branch. Learn load distribution in our landscape lighting zone planning guide.
Q: What causes flickering in low voltage landscape lights?
A; Flickering is most commonly caused by voltage drop from undersized wire or excessive run length, loose wire connections, a transformer running near or above capacity, or an LED fixture connected to an incompatible transformer. See our voltage drop troubleshooting guide for detailed solutions.
Q: Do I need a hub for low voltage landscape lighting?
A; Not always. For smaller installs with fewer than 10 fixtures on a single zone, home-run wiring directly to the transformer works well. A hub becomes beneficial when managing multiple fixture zones or runs exceeding 100 feet. Learn strategic implementation in our landscape lighting zone planning guide.
Q: What is the difference between a hub and a transformer in landscape lighting?
A; A transformer converts 120V household power to 12V and is the power source for the entire system. A hub is a distribution device that splits one power input into multiple fixture outputs — it does not generate power on its own. Browse transformer options in our transformers catalog.
Q: Can I mix LED and halogen fixtures on the same low voltage system?
A; Technically yes, but it requires careful load calculation and transformer compatibility checks. LED and halogen fixtures have very different wattage draws, and mixing them can complicate voltage balancing across runs. Review our LED versus halogen fixture comparison for compatibility guidance.
Q: How do I know if my transformer is the right size for my install?
A; Add up the total wattage of all fixtures, then multiply by 1.2 to get your minimum transformer rating. For example, a 100W total fixture load requires at least a 120W transformer — most installers would choose the next standard size up, typically 150W. Use our landscape lighting transformer sizing guide for precise calculations.
Glossary of Terms
Direct Burial Wire
Electrical wire with a moisture-resistant outer jacket designed to be installed underground without additional conduit. Required for all below-ground low voltage landscape lighting runs. See our outdoor wiring specification and repair guide for proper selection and installation.
Landscape Lighting Hub
A weatherproof distribution box that accepts one power input from the transformer and splits it into multiple output branches, each serving a fixture or group of fixtures in a defined zone. Learn strategic implementation in our landscape lighting zone planning guide.
GFCI Outlet (Ground Fault Circuit Interrupter)
A specialized electrical outlet that detects imbalances in current flow and shuts off power within milliseconds to prevent electric shock. Required for all outdoor outlet connections under the National Electrical Code. Follow National Electrical Code low-voltage requirements for proper installation.
Voltage Drop
The reduction in electrical voltage that occurs as current travels along a wire. In low voltage landscape lighting installation, excessive voltage drop causes dimming and uneven fixture performance, particularly on long wire runs. See our voltage drop troubleshooting guide for prevention strategies.

Conclusion
A well-executed low voltage landscape lighting installation does more than light up a yard — it extends usable outdoor space into the evening, improves curb appeal, and adds a layer of security that motion sensors alone can’t match. The technology is accessible, the voltage is safe, and the results are immediate.
The key is preparation. Map your fixture locations, calculate your transformer load using our landscape lighting transformer sizing guide, choose your wiring method, and select the right wire gauge for your run lengths before you buy anything. Use a hub when your design spans multiple zones per our landscape lighting zone planning guide.
Bury wire to code depth following National Electrical Code low-voltage requirements. Verify voltage at your farthest fixture before you call the project complete using our voltage drop troubleshooting guide.
Whether you’re installing a modest set of pathway landscape lights along a front walkway using our pathway light placement and spacing guidelines or building out a full landscape lighting design with professional tree uplighting techniques, garden accents, and driveway borders, the principles are the same: plan carefully, wire correctly, and size your transformer with room to grow.
Ready to get started? Browse our full selection of low voltage landscape lighting kits, hubs, transformers, and LED landscape lights — review our LED versus halogen fixture comparison for selection guidance — to build a system that fits your property and your budget. For hands-on setup support, follow our low voltage landscape lighting installation guide.