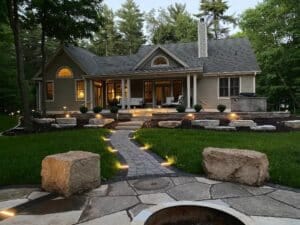
Most homeowners install pathway lights as an afterthought—a few solar stakes jabbed into the ground before a dinner party. The result is uneven lighting, dead zones, and fixtures that clash with the home’s style. Done right, pathway landscape lights do more than guide footsteps. They define your property’s nighttime personality, improve safety, and can add measurable value to your home.
This guide walks you through the decisions that actually matter: how far apart to space your lights, how high to mount them, which power system to choose, and how to match fixtures to your landscape style. Whether you’re planning a DIY weekend project with a low voltage landscape lighting kit or working with a professional landscape lighting installer, these principles apply.
Key Takeaways
- Pathway landscape lights should be spaced 6–10 feet apart for balanced illumination.
- Low voltage landscape lighting kits are beginner-friendly and energy efficient.
- LED landscape lights last significantly longer than halogen alternatives.
- Matching fixture style to your home’s architecture elevates overall curb appeal.
- A landscape lighting transformer is essential for safe, code-compliant low-voltage systems.
- Alternating lights on both sides of a path creates depth without over-lighting.
Understanding the Basics of Pathway Lighting
What Pathway Lights Are Actually Doing
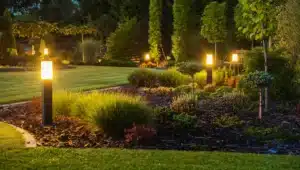
A pathway light serves two functions simultaneously: it illuminates the walking surface so people don’t trip, and it contributes to the overall landscape lighting design of your property. These two goals sometimes pull in different directions. A fixture optimized purely for safety might throw a harsh white pool of light that looks institutional. A fixture chosen purely for aesthetics might glow beautifully while leaving the pavers in shadow.
The best pathway lights balance both. They cast enough downward light to illuminate 2–3 feet of ground around their base while contributing warm, layered light to the broader outdoor landscape lighting scheme.
Low Voltage vs. Solar vs. Line Voltage
| Feature | Low Voltage (12V) | Solar | Line Voltage (120V) |
|---|---|---|---|
| Installation difficulty | Moderate (DIY-friendly) | Easy | Requires electrician |
| Operating cost | Very low | Free (sun-dependent) | Higher |
| Brightness consistency | High | Variable (weather-dependent) | High |
| Lifespan | Long (LED models) | Moderate (battery limits) | Long |
| Design flexibility | High | Moderate | High |
| Code requirements | Minimal | None | Significant |
For most homeowners, low voltage landscape lighting kits hit the sweet spot. They run on 12 volts through a landscape lighting transformer that plugs into a standard outdoor outlet, making them safe, affordable, and code-compliant under National Electrical Code standards (NFPA 70) without requiring a licensed electrician. According to energy efficiency data from the U.S. Department of Energy, LED options in these systems offer superior longevity and lower operating costs compared to traditional bulbs.
If you need maximum brightness with zero maintenance, choose professionally installed low-voltage LED systems why low voltage outshines solar for consistent performance. If you need zero wiring and zero operating cost, solar pathway lights work well on sunny properties with consistent sun exposure on the fixture locations.
Placement: Where to Put Pathway Lights
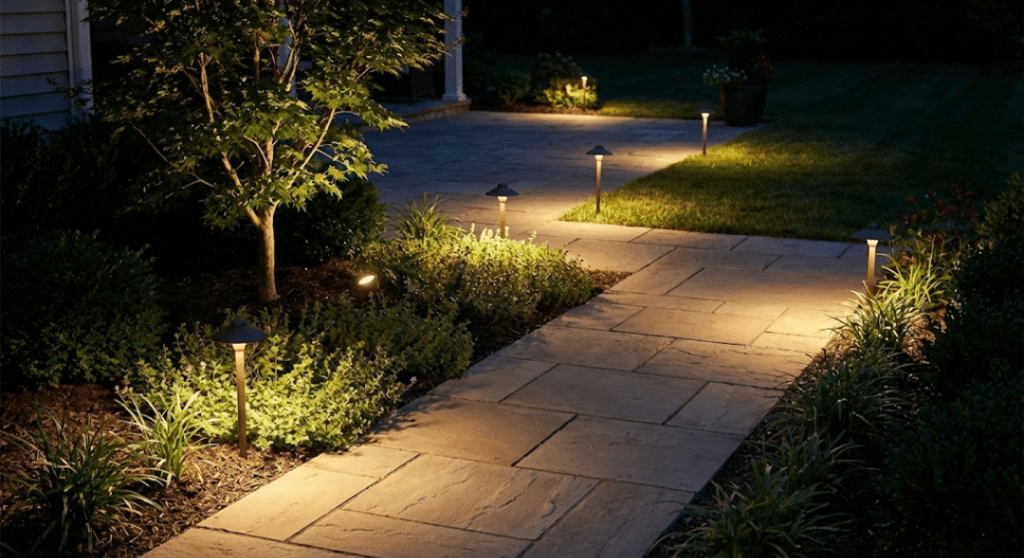
The Rule of Pools
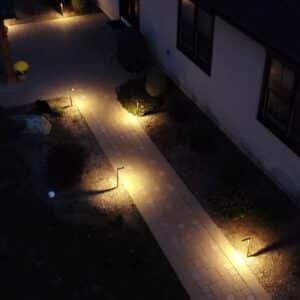
Each pathway light projects a “pool” of light on the ground. Your goal is for adjacent pools to slightly overlap, creating a continuous ribbon of illuminated surface. The ideal placement ensures no dark gaps between fixtures while avoiding the washed-out look of over-lit paths.
Step-by-step placement process:
- Walk the path at night with a flashlight to identify naturally dark zones and trip hazards.
- Mark the path edges with stakes or chalk to define the usable walking corridor.
- Decide on alternating or parallel placement. Alternating fixtures on opposite sides of the path creates visual depth. Parallel placement (both sides aligned) looks more formal.
- Place the first fixture 2–3 feet from the start of the path.
- Space subsequent fixtures 6–10 feet apart, depending on the fixture’s beam spread and wattage (refer to our expert spacing tips for specific scenarios).
- Add fixtures at curves and stairs regardless of regular spacing—these are safety-critical zones.
- Test with temporary placement before committing to digging or staking.
Height Matters
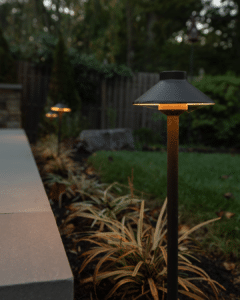
Pathway light fixtures are typically mounted at 12–18 inches above grade. Shorter fixtures (under 12 inches) create intimate, ground-hugging ambiance but can be obscured by taller ground cover. Taller fixtures (18–24 inches) are more visible but can direct light into eye level rather than downward.
For most residential paths, 15 inches is a reliable default height that keeps light aimed at the ground while staying visible above seasonal plantings.
Spacing Guidelines by Path Type
Straight Paths
On straight runs, consistent 8-foot spacing on alternating sides is widely recommended by outdoor landscape lighting professionals. This creates a gentle zigzag rhythm that’s both functional and visually interesting.
Curved or Winding Paths
Reduce spacing to 6 feet on curves. The inside of a curve loses light faster than the outside, so slightly tighter spacing compensates.
Steps and Elevation Changes
Every step riser or grade change should receive dedicated lighting, independent of your regular spacing pattern. A missed step in the dark is a liability issue—industry guidance from the Illuminating Engineering Society (IES) consistently identifies the critical role of step lighting as a safety priority in residential outdoor settings.
Entry Approaches
For the final 10–15 feet approaching a front door, consider reducing spacing to 5–6 feet and increasing wattage slightly. This zone receives the most foot traffic and creates the critical first impression of your home at night.
Style Tips: Matching Fixtures to Your Home
Fixture Styles at a Glance
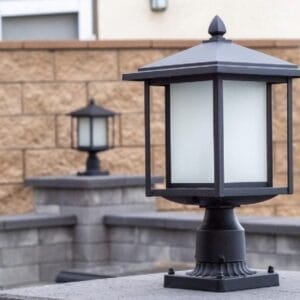
Traditional/Colonial homes pair well with lantern-style fixtures in black, bronze, or antique brass. Tapered shades with classic proportions reinforce the architectural vocabulary.
Modern and contemporary homes suit low-profile, geometric fixtures—cylindrical caps, flat disc designs, or stake lights with minimal ornamentation in matte black or brushed aluminum.
Craftsman and bungalow styles align with warm bronze or weathered copper finishes, mission-inspired cap shapes, and fixtures with visible texture or patina.
Mediterranean and Spanish Revival homes favor terracotta or aged iron fixtures with arched or bell-shaped caps.
The Three-Metal Rule
Avoid using more than three metal finishes across all exterior fixtures—pathway lights, wall sconces, door hardware, and house numbers included. Mixing too many metals creates visual noise. Pick one dominant finish for pathway lights and ensure it echoes at least one other exterior element.
Pros and Cons of DIY vs. Professional Landscape Lighting
Whether you are weighing DIY versus professional installation, understanding the trade-offs is key to a successful project.
DIY Low Voltage Kits
Pros:
- Lower upfront cost
- No scheduling or contractor fees
- Flexible—easy to reposition or expand
- Low voltage landscape lighting kits often include everything needed to start
Cons:
- Risk of uneven illumination if wire runs are improperly loaded
- Transformer sizing mistakes can reduce fixture performance
- Aesthetic results vary widely based on installation care
- No warranty labor coverage if something goes wrong
Professional Landscape Lighting
Pros:
- Engineered for uniform light output and fixture longevity
- Transformers, wire gauges, and fixture counts are load-calculated
- Professional landscape lighting companies often provide multi-year service warranties
- Better integration of uplighting for trees, downlighting, and path lighting into a cohesive design
Cons:
- Significantly higher upfront cost
- Less flexibility for spontaneous adjustments
- Requires scheduling and site visits
Do / Don’t: Pathway Lighting Best Practices
Do:
- Use LED landscape lights exclusively—they consume a fraction of the energy of halogen and last far longer
- Size your landscape lighting transformer to 50–60% of capacity to allow for future expansion (see our transformer sizing guide for exact calculations)
- Bury wire at least 6 inches deep even for low-voltage systems to protect against lawn maintenance damage
- Use weatherproof wire connectors rated for direct burial
- Aim fixture heads slightly toward the path, not straight down
Don’t:
- Overload a transformer—exceeding its wattage rating will shorten transformer and fixture life
- Space lights more than 10 feet apart expecting adequate illumination
- Use fixtures with upward-facing openings in areas with heavy rainfall or irrigation spray
- Mix color temperatures (warm 2700K and cool 4000K) in the same path run—it looks disjointed
- Ignore voltage drop issues on long wire runs; fixtures at the far end of a long run will be dimmer than those near the transformer
Real-World Scenario (Hypothetical)
Hypothetical example: A homeowner in suburban Atlanta has a 60-foot brick path from the driveway to the front door. They purchase a low voltage landscape lighting kit with 10 fixtures and a 150-watt transformer. Following the alternating placement method at 8-foot intervals, they stake lights on opposite sides of the path, add two extra fixtures at the three steps near the door, and connect everything to a single 12-gauge wire run. Total draw is 40 watts—well within the transformer’s capacity. The result is a balanced, warm ribbon of light from driveway to door that doesn’t blind approaching guests.
This approach mirrors recommendations from landscape professionals affiliated with the Association of Professional Landscape Designers, who emphasize load management and safety-zone prioritization.
Quick Answers — FAQ
How far apart should pathway landscape lights be spaced? Most outdoor landscape lighting professionals recommend 6–10 feet apart on alternating sides of the path. Curves, steps, and entry approaches may require tighter spacing of 5–6 feet.
What is the best wattage for pathway lights? For LED landscape lights, 3–6 watts per fixture is sufficient for most residential paths. Higher wattages can create glare and wash out the layered lighting effect.
Do I need a transformer for low voltage pathway lights? Yes. A landscape lighting transformer is required to step down standard 120V household current to 12V. Always size your transformer to no more than 60% of its rated wattage capacity.
Are solar pathway lights as bright as wired lights? Generally no. Solar pathway lights depend on daily sun exposure and battery capacity, which means brightness can be inconsistent. Wired LED landscape lights deliver consistent output regardless of weather.
What color temperature is best for pathway lighting? 2700K–3000K (warm white) is recommended for most residential settings. It complements landscape colors, feels inviting, and doesn’t create harsh contrast against the surrounding darkness. For a detailed breakdown, consult our color temperature guide.
Can I mix pathway lights with uplighting for trees? Yes, and mastering techniques for uplighting trees adds vertical dimension while pathway lights handle horizontal illumination, creating a layered, naturalistic effect.
How deep should I bury low voltage landscape lighting wire? Bury wire at least 6 inches deep to protect it from lawn edging, aerators, and general yard maintenance. Some installers go 8–10 inches as standard practice.
How many pathway lights do I need per foot of path? A general rule is one fixture for every 6–8 linear feet of path when using alternating placement. A 48-foot path would typically use 6–8 fixtures.
What’s the lifespan of LED pathway lights? Quality LED landscape lights typically last 30,000–50,000 hours, which translates to many years of nightly use before replacement is needed.
Can pathway lights be used without a timer or photocell? Technically yes, but a timer or photocell on your landscape lighting transformer is strongly recommended. It prevents fixtures from running during daylight hours, extends LED life, and reduces energy use.
Glossary of Terms
Low Voltage Landscape Lighting: An outdoor lighting system that operates at 12 volts, supplied by a transformer plugged into a standard 120V outlet. It is safer, more DIY-friendly, and less expensive to install than line-voltage systems.
Landscape Lighting Transformer: An electrical device that converts 120V household current to 12V for use in low-voltage outdoor lighting systems. It typically includes timer and photocell controls and is rated by total wattage capacity.
Voltage Drop: A reduction in electrical voltage that occurs over long wire runs, causing fixtures furthest from the transformer to appear dimmer. It’s mitigated by using heavier-gauge wire or loop wiring configurations.
Beam Spread: The angular width of light emitted by a fixture, measured in degrees. A narrow beam spread (15–30°) creates a focused spotlight effect, while a wide beam spread (60°+) diffuses light over a broader area—more common in pathway fixtures.
Conclusion
Getting pathway landscape lights right is less about picking the prettiest fixture and more about understanding how light behaves in space. Consistent spacing, correct height, proper transformer sizing, and style-matched fixtures work together to produce a result that’s both beautiful and functional. Whether you’re installing a low voltage landscape lighting kit on a Sunday afternoon or commissioning a full professional landscape lighting design, the principles in this guide give you a solid foundation.
Start with your path’s specific challenges—steps, curves, entry points—then build your lighting plan outward from those priorities. Choose LED landscape lights for longevity and efficiency, match fixture style to your architecture, and size your transformer with room to grow. The difference between a forgettable path and a welcoming, well-lit approach to your home comes down to these decisions.
Ready to plan your pathway lighting project? Review your path layout, measure your distances, and use the spacing guidelines above to determine how many fixtures you need before purchasing.